SEVIS Help Hub illustration

SEVIS Help Hub

Change Education Level

Change Education Level

Last updated: February 3, 2023

Quick Links:

|

Students often begin a new program of study at the same school. The designated school official (DSO) uses the Change Education Level link to create a new Form I‑20, Certificate of Eligibility for Nonimmigrant Student Status, for a student who is changing education levels to start a new program of study at the same campus of the same school; for example, a student moving from Bachelor’s to Master’s while staying at the Downtown Campus of Potomac College.

Icon - Pay attention to an important point

Do not use the Change of Level link when:

  • A student is changing educational levels and transferring to a different campus at the same school. In this case, use the SEVIS record transfer process.
  • You only need to correct the student’s education level, because of an error on the student’s Form I-20. Use the Update Program Information function instead. See the Update Program Information User Guide for further details.

F-1 Change of Education Level Process and Players

Step Player/s Action
1 Student/School Notifies DSO to change education level.
2 DSO Initiates change of level process through Change of Education Level link. 
3 SEVIS Creates new program of study record for student in Initial status. 
4 DSO Registers student in the new Initial program of study record after the student completes their current education level. 
5 SEVIS Deactivates previous program of study record.
Icon - Pay attention to an important point

Important:

  • You must submit the change of level Form I-20 before the end of the 60-day grace period after the Program End Date.
  • Once the student is registered in SEVIS for the new education level, you will no longer be able to update the record for the previous education level. 

To change a student’s education level in SEVIS:

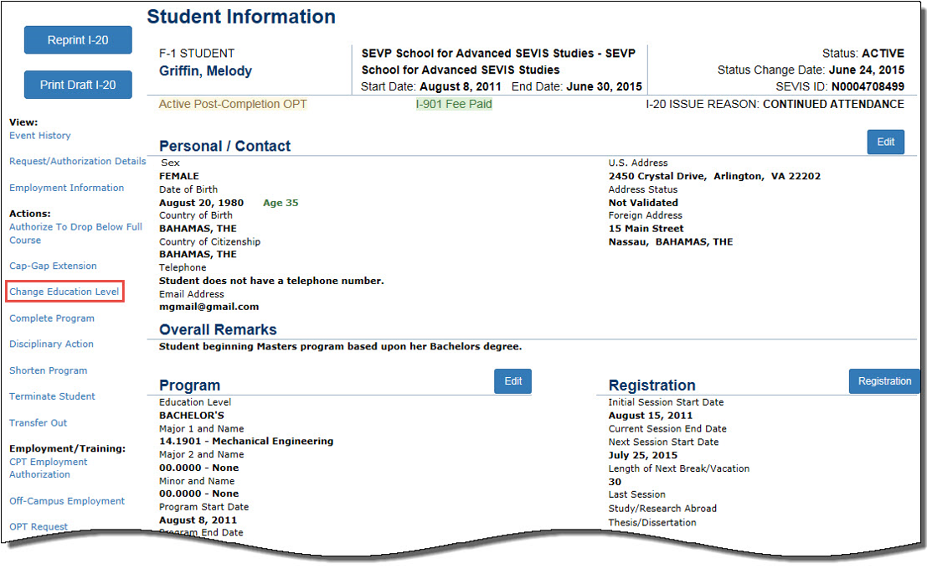
  • Go to the Student Information page.
Student Information page with Change Education Level highlighted
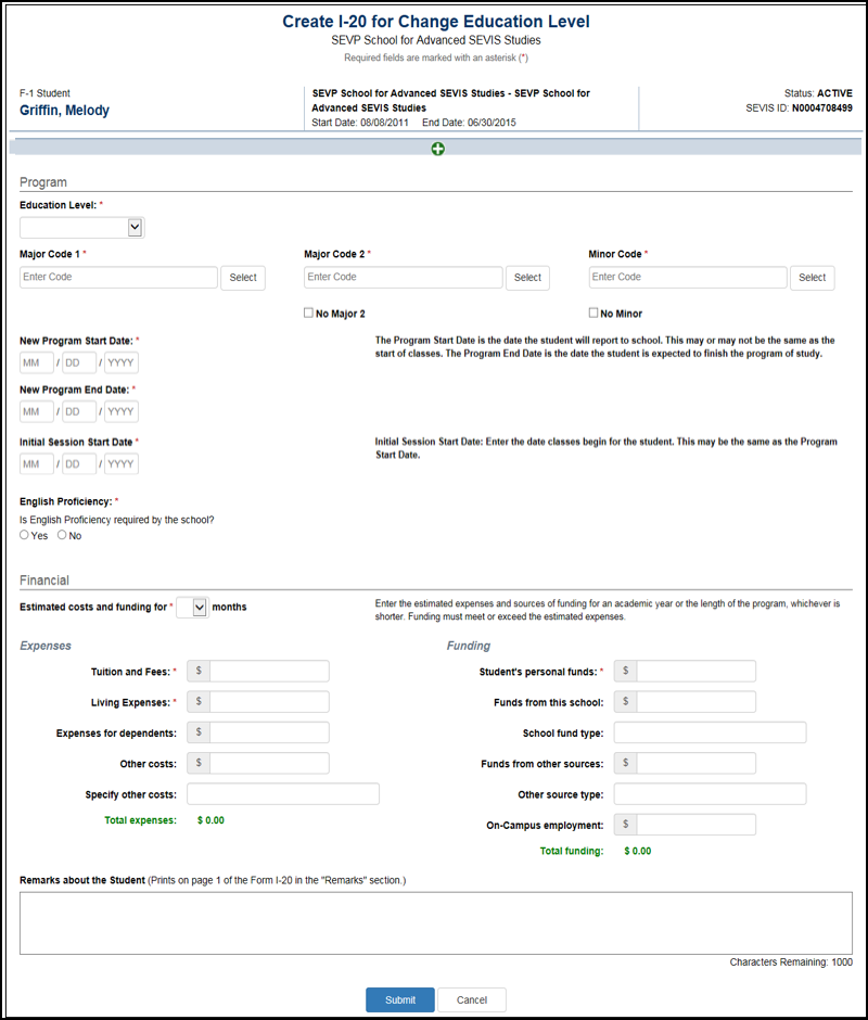
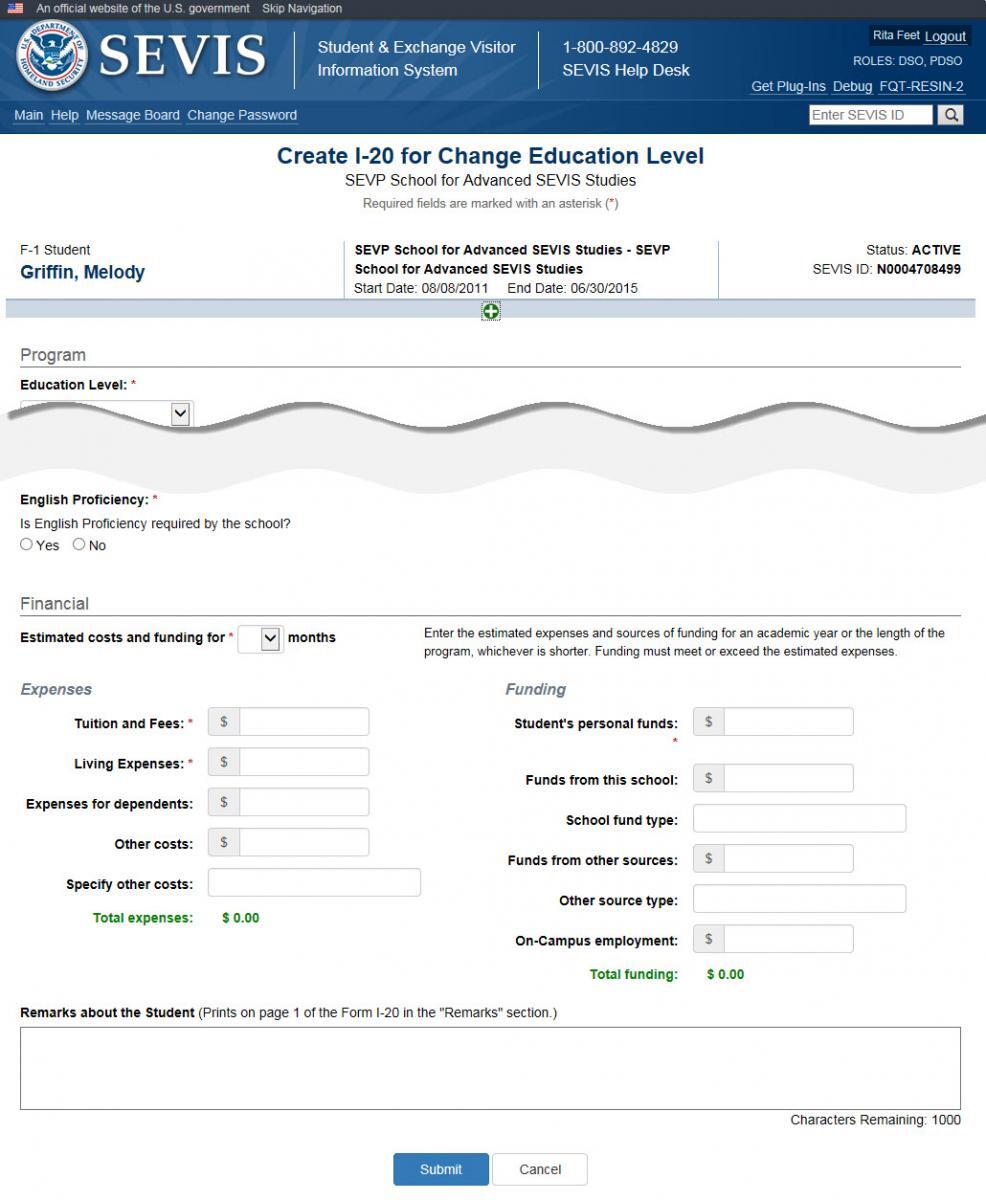
  • Click the Change Education Level link. The Create I-20 for Change Education Level page opens with two sections for changing:
    • Program
    • Financial
image of field forms to fill out

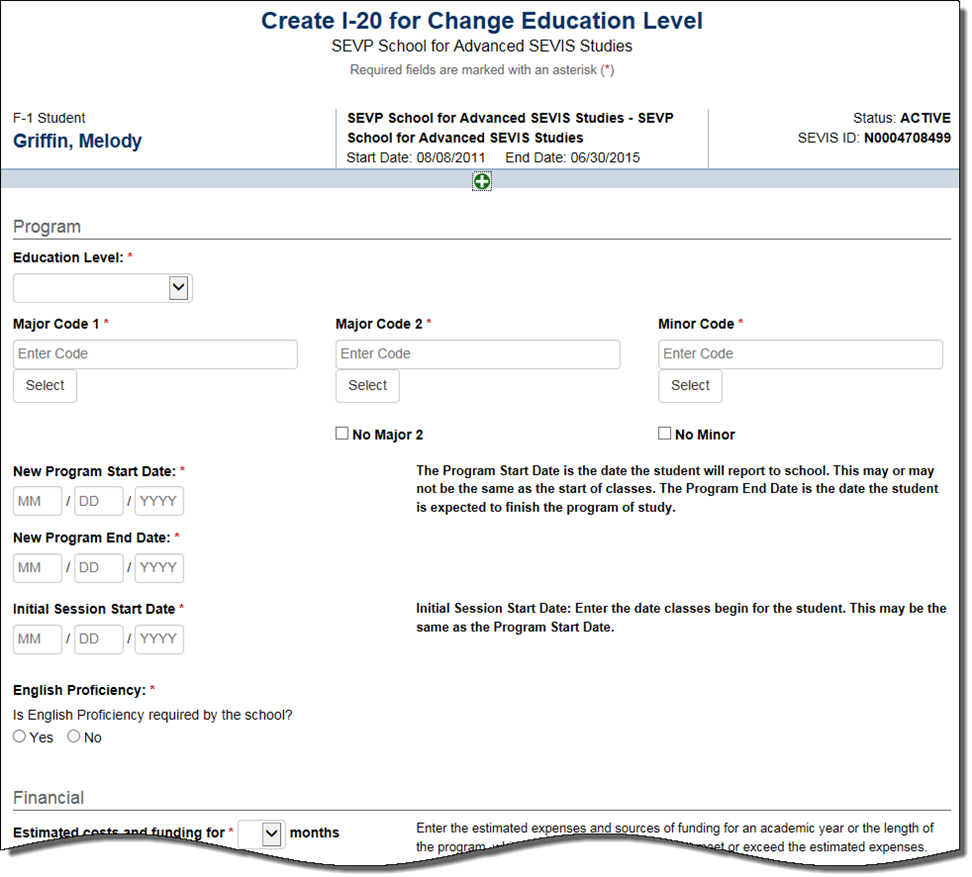
The Program section contains fields for requesting the student’s change of education level. Complete the fields in the Program section. An Asterisk (*) indicates a required field.

screenshot of program section

Education Level

Select the level of education pursued by the student from the drop-down list. The options include:

  • Primary
    • If you select Primary, SEVIS will automatically enter the classification of instructional program (CIP) code for “Primary School” (90.0101) into the Major Code 1 field.
    • The Primary School CIP code cannot be edited.
Icon- additional information is available

Classification of Instructional Programs (CIP) codes are a list of numbers assigned to specific fields of study. The U.S. Department of Education (ED) manages this list to better track and report fields of study completion in the United States.

  • Secondary: Secondary indicates the student is in grades 9-12 at a private or public school, or their equivalent.
    • If you select Secondary, there are ten acceptable CIP codes:
    1.  Click Select under the Major Code 1 field to display the acceptable CIP codes.
    2. Select the CIP code number link for the desired code.
  • Associate
  • Bachelor’s
  • Master’s
  • Doctorate
  • Language Training
    • If you select Language Training, SEVIS will automatically enter the “Second Language Learning” CIP code (32.0109) into the Major Code 1 field.
    • The Second Language Learning CIP code cannot be edited.
  • Other

        If you select Other, an If Other, enter here [] field will appear:

  • Describe the education level here.
  • This is a required field.
Icon- best practice

Most post-secondary schools have a set list of CIP codes approved by the ED for their particular programs. Contact the CIP code coordinator (often called the (IPEDS Keyholder/Coordinator, and often someone in the Registrar’s Office) for the list of CIP codes approved for programs at your school.

For more information about CIP codes see the National Center for Education Statistics site.

Major Code 1

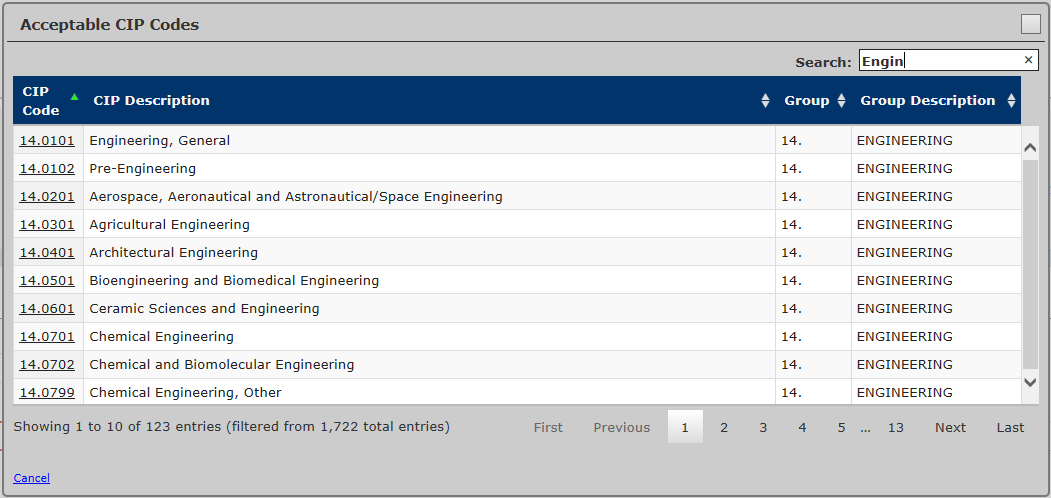
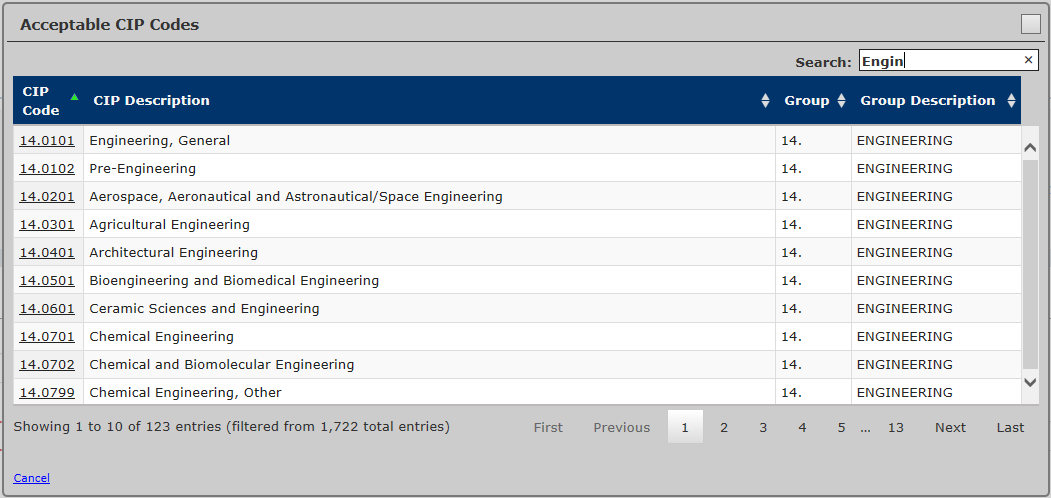
  • Enter the CIP code of the student’s primary major or click Select to open the Acceptable CIP Codes modal.
acceptable cip codes
  • Search for the CIP code by either:

  • Entering search terms to find the appropriate CIP code; for example, Communications, Business, Engineering, etc.
  • Entering the CIP code family number, for example, “14.” for the Engineering programs.
  • Select the CIP code by clicking the code number. The Acceptable CIP Codes window closes.
  • After selecting a code, SEVIS enters the CIP code in the Major Code 1 field.
  • This is a required field.

Note: You must select an Education Level before you can enter the Major Code.

Major Code 2* 

Some students have a secondary major, usually in a related field. Use this field for the secondary major CIP code.

  • Enter the CIP code of the student’s primary major, or click Select to open the Acceptable CIP Codes window.
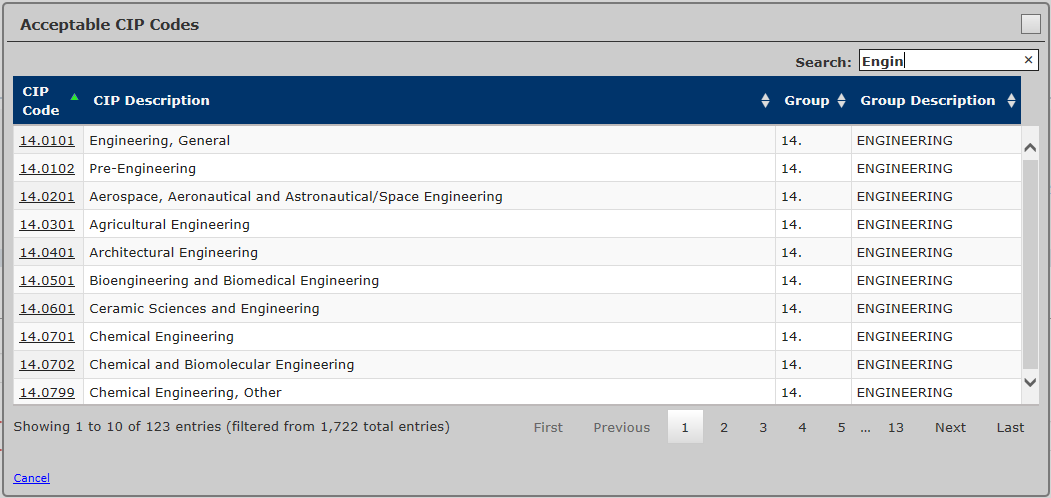
Classification of Instructional Programs (CIP) Code Picker
  • Search for the CIP code by either:
    • Entering search terms to find the appropriate CIP code, for example, Communications, Business, Engineering, etc.
    • Searching for a program family by code number followed by a period, for example, “14.” for the Engineering programs.
  • Select the code by clicking the code number. The Acceptable CIP Codes modal closes.
  • After selecting a code, SEVIS will enter the CIP code in the Major Code 2 field.
  • If the student does not have a second major, click the No Major 2 checkbox.
  • This is a required field.

Minor Code* 

  • Enter the CIP code of the student’s minor or use the search tool by clicking Select. The Acceptable CIP Codes window opens.
Classification of Instructional Programs (CIP) Code Picker
  • Search for the CIP code by either:
    • Entering search terms to find the appropriate CIP code, for example, Communications, Business, Engineering, etc.
    • Entering the CIP code family number, for example, “14.” for the Engineering programs.
  • After selecting a code, SEVIS will enter the CIP code in the Minor Code field.
  • If the student does not have a minor, click the No Minor checkbox.
  • This is a required field.

New Program Start Date* 

Icon - Pay attention to an important point

All program and session dates entered in SEVIS must correspond to your school’s academic calendar.

  • Enter the date on which the student will begin his or her program.
  • This may be the date of any required orientations or other activities before the start of classes.
  • This is a required field.
Icon - Regulatory or policy resources
  • F-1 Change in educational levels – 8 CFR 214.2(f)(5)(ii) 
  • F-1 School transfer – 8 CFR 214.2(f)(8)(i)
  • The regulation for changing the educational levels cites the program start date timeline used for school transfers. The new program start date must occur within five months of completing the current program.
Icon - Pay attention to an important point
  • Schools can choose to enter the New Program Start Date and the Initial Session Start Date as the same date. If the dates differ, the Program Start Date cannot be more than 30 days before the Initial Session Start Date.
  • Entering an invalid date will result in the following message: Program Start Date must be on or after today and no more than a year from today.

New Program End Date*

  • Enter the expected date of completion of the academic or vocational program.
  • Do not consider grace periods or any future employment authorizations.
  • This is a required field.

Initial Session Start Date*

  • Enter the date that the student will begin classes.
  • This date cannot be more than 30 days from the Program Start Date.
  • This is a required field.

Note: Registration alerts are tied to this date.

English Proficiency* 

  1. In the English Proficiency section, answer the question “Is English proficiency required by the school?” Click either the Yes or No radio button:
  • Yes – Requires a further Yes or No confirmation that the student has the required English skills.
Create Certificate of Eligibility (form I-20) for Transfer In: Personal and Program Information page, English Proficiency section- Student does have needed proficiency.  Create Certificate of Eligibility (form I-20) for Transfer In: Personal and Program Information page, English Proficiency section- Student does have needed proficiency.
Icon - Pay attention to an important point

If the school requires English proficiency and the DSO selects No for Does the student have the required English Proficiency, SEVIS will prevent the DSO from completing the Form I-20.

Text that says "Students are required to have English proficiency in order to enter this program"
  • No – Requires an explanation on why the school does not require the student to be proficient in English.
Text showing reason why the school does not require English proficiency

        2. Click Next. The second page of the Create Certificate of Eligibility (Form I-20) for Transfer-In: Financial Information page opens.

F-1 or M-1 students must prove they have the financial resources to live and study in the United States. Enter the student’s expenses and funding for the length of the program in the Expenses and Funding sections under the Financial section of the page.

Financial section

Note: All dollar amounts must be entered in the Expenses and Funding sections without commas and periods, and should be rounded to the nearest dollar. For example, $25,057.89 should be entered as 25058.

Estimate costs and funding for *___ months

Enter the number of months for either the academic year or the length of the program, whichever is shorter:

  • Use the drop-down list in the Estimated costs and funding for*__ months field to select the number of months for estimating expenses and sources of funding.
  • This is a required field.

Expenses

Enter the student’s expenses for one academic term:

  • Tuition and Fees*
    • Enter the amount for the student’s tuition and fees.
    • This is a required field.
  • Living Expenses*
    • Enter the amount for the student’s living expenses.
    • This is a required field.
  • Expenses for Dependents
    • Enter the amount of expenses for any dependents.
    • The number of dependents currently associated with the student displays by the field name.
    • This is a required field.
  • Other Costs – Enter any other costs for the months of estimated expenses.
  • Specify Other Costs – Enter the reason for any other costs.
  • Total Expenses – SEVIS calculates the costs and displays the total expenses at the bottom of the Expenses section.

Funding

Enter the student’s funding for the number of months specified:

  • Student’s Personal Funds*
    • Enter the amount of the student’s personal funds.
    • This is a required field.
  • Funds from this School – Enter the amount of any funding offered by your school.
  • School Fund Type – Enter the type of school fund offered by your school, for example, an academic scholarship.
  • Funds from Other Sources – Enter the amount of any funding from any other sources.
  • Other Source Type – Enter the type of funding from any other sources, for example, a private grant.
  • On-Campus Employment – Enter the amount of the student’s on-campus employment.
  • Total Funding – SEVIS calculates and displays the student’s total funds at the bottom of the Funding section.
Icon - Pay attention to an important point

The student’s total funds must meet or exceed the expenses, before the DSO may issue the student’s Initial Certificate of Eligibility (Form I-20).

Enter any applicable comments about the student in the Remarks about the Student field:

  • This field has a 1,000-character limit with a Characters Remaining counter.

See which types of comments appear and where on the Form I-120 in SEVIS Remarks on the COE (Form I-20) Help Hub article.

After entering any necessary information, click either Submit or Cancel:

  • Submit: Creates a new Form I-20 for the new education level. The Create Successful page opens with two options, View Record or Print I-20.
Icon - Pay attention to an important point

The student will now have two records under the same SEVIS ID, one Initial and one Active. 

Create Successful message
  • View Record – Returns the user to the Student Information page.
  • Print I-20 – Prints the student's Form I-20.
Icon - Regulatory or policy resources
  • Students are expected to keep all Forms I-20 issued during their academic career.
  • When information on the Form I-20 changes, it is best to give a new copy to the studnet.
  • Find information on allowable electronic signatures and Form I-20 transmission in SEVP’s policy guidance Use of Electronic Signatures and Transmission for the Form I-20
Icon - Pay attention to an important point

You cannot edit the Initial record of a student who is requesting a change of education level from their original Active record. Any changes would be made through the new Initial record.

After submitting the request on SEVIS:

  1. Continue to update the Active record, as necessary, until the student has completed their current education level.
  2. Register the student in SEVIS, using the newly created Initial record based on the new program start date.
  3. Update the newly created Active record, as necessary, once the student begins the new education level.
Icon - Pay attention to an important point

Once the student is registered in SEVIS for the new education level, you will no longer be able to update the record for the previous education level.

Icon- additional information is available
  • You cannot cancel the Initial record of a student who is requesting a change of education level.
  • You must cancel the change of education level request through the Active record.

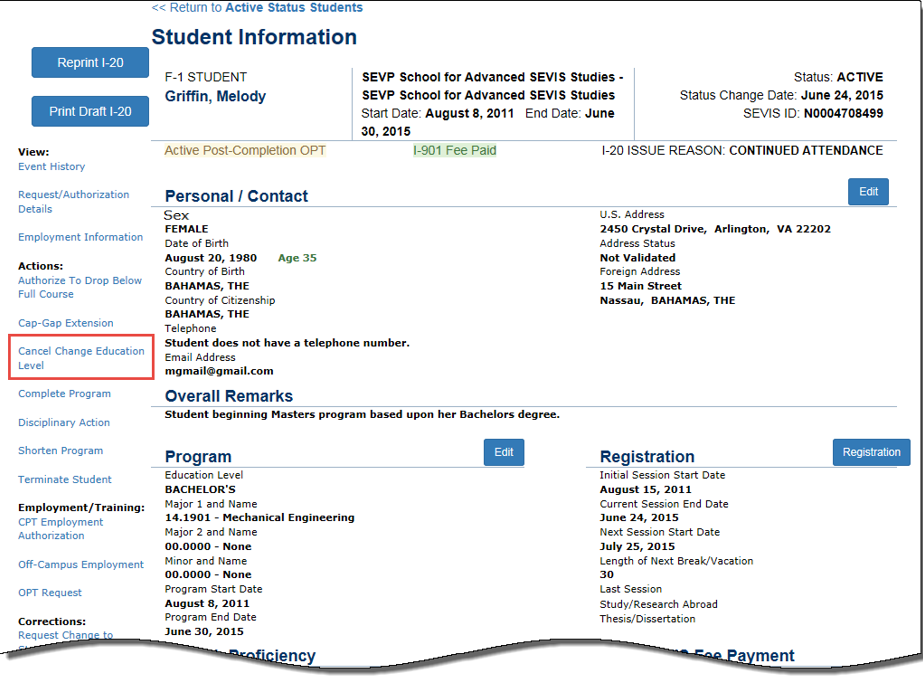
To cancel a student’s change of education level request:

  1. Find the student’s Active record. (See the SEVIS Help Hub for information on F/M Nonimmigrant Searches.)
  2. Click the student’s Surname/Primary Name. The Student Information page opens.
Student Information Page with Cancel Change Education Level call-out

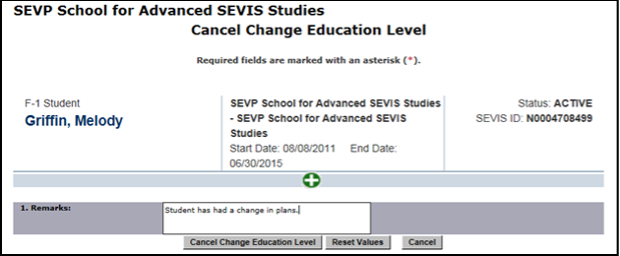
       3. Click Cancel Change Education Level in the Actions menu. The Cancel Change Education Level page opens.

Cancel Change Education Level Page

     4. Enter any applicable comments in the Remarks field.

     5. Click either the Cancel Change Education Level, Reset Values, or Cancel button:

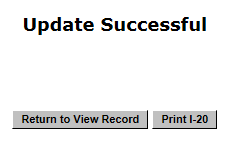
  • Cancel Change Education Level – Cancels the student’s change of education level request. An Update Successful page opens with two options, Return to View Record or Print I-20:  
update successful image
  • Return to View Record – Returns to the Student Information page. The student’s Initial record (for the new education level) is now in Deactivated status.
  • Print I-20 – Generates the PDF of the Form I-20 that can be printed.
  • Reset Values – Clears any entries made in the Remarks field.
  • Cancel – Returns to the Student Information page without taking any action on the student’s record.

What's New

Chatbot

Try the Facebook Chatbot

Visit the tool on the Study in the States Facebook page to learn how to become an F or M international student in the United States.

Summer Employment

Learn About Summer Employment

While employed this summer, make sure you have all the relevant information on maintaining your student status, and the steps you must take before returning to school. 

Icon Guide

See the SEVIS Help Icons on the SEVIS Help Hub for a quick-reference of the icons used in this user guide.

I'm Looking For

Contact Us

Phone

SEVP Response Center

703-603-3400

Office

Monday - Friday 
8:00 a.m. to 6:00 p.m. ET,
except holidays

Was This Helpful?
Please provide feedback on this page.