SEVIS Help Hub illustration

SEVIS Help Hub

Student Event History

Breadcrumb

Student Event History

Last updated: October 31, 2023

Quick Links:

|

The Event History page records all actions taken on a nonimmigrant’s record. Student and Exchange Visitor Information System (SEVIS) users can view the information since the record was created. By default, the most recent events display on top. Users have the ability to sort the list by any of the columns and to filter the list to display only certain types of events. Users can also expand some events to view additional details about the event, including the before and after values for the fields. In addition to summary data, the Event History page displays the name of the event, the date the event occurred, the current student status, and who made the change.

Icon - Pay attention to an important point

Designated school officials (DSOs) can only view events that occurred at:

  • Their school.
  • That program level.

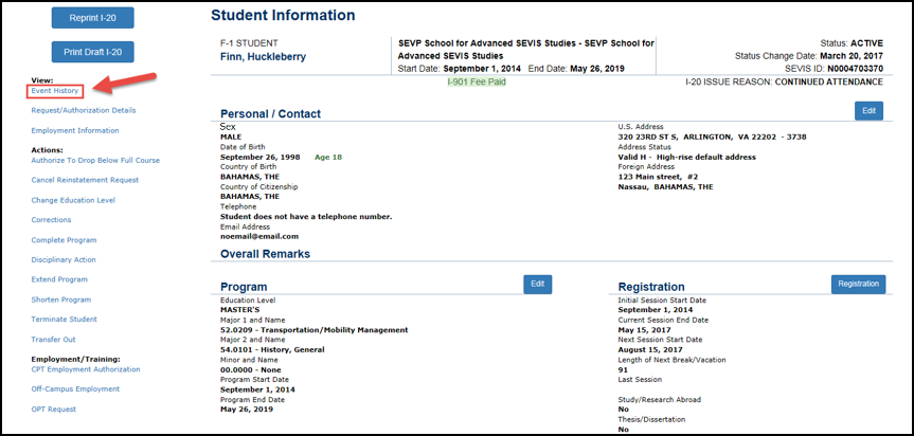
1. Go to the Student Information page.

Student Information page

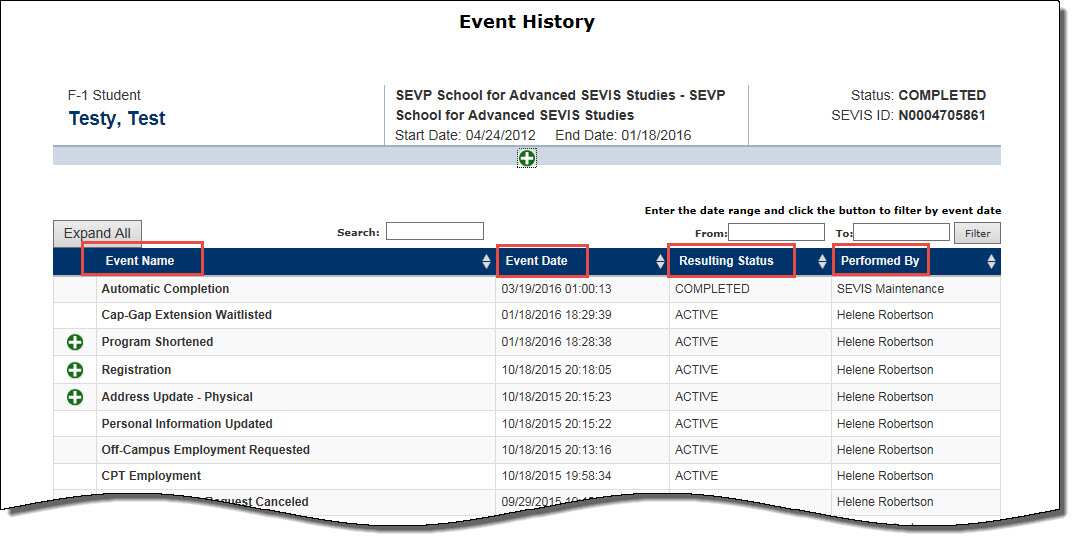
2. Click Event History in the menu on the left side of the page. The Event History page opens, which contains the following columns and features:

Event History
  • Columns:
    • Event Name: Brief description of the change to the SEVIS record.
    • Event Date: Date the change occurred.
    • Resulting Status: Status to which the record changed when the event occurred.
    • Performed By: This can be any of the following:
      • Name of the school official who made the change to the record.
      • DHS Official: Someone from the Department of Homeland Security (DHS) updated the record.
    • System Interface: Change occurred because of information received from an application outside SEVIS.
    • SEVIS Maintenance: Change occurred because of automated system processing (for example, on the effective date of transfer listed on a nonimmigrant’s record, the nonimmigrant’s status automatically changes to Transferred) or because of a manual data change (data fix).
  • Features:
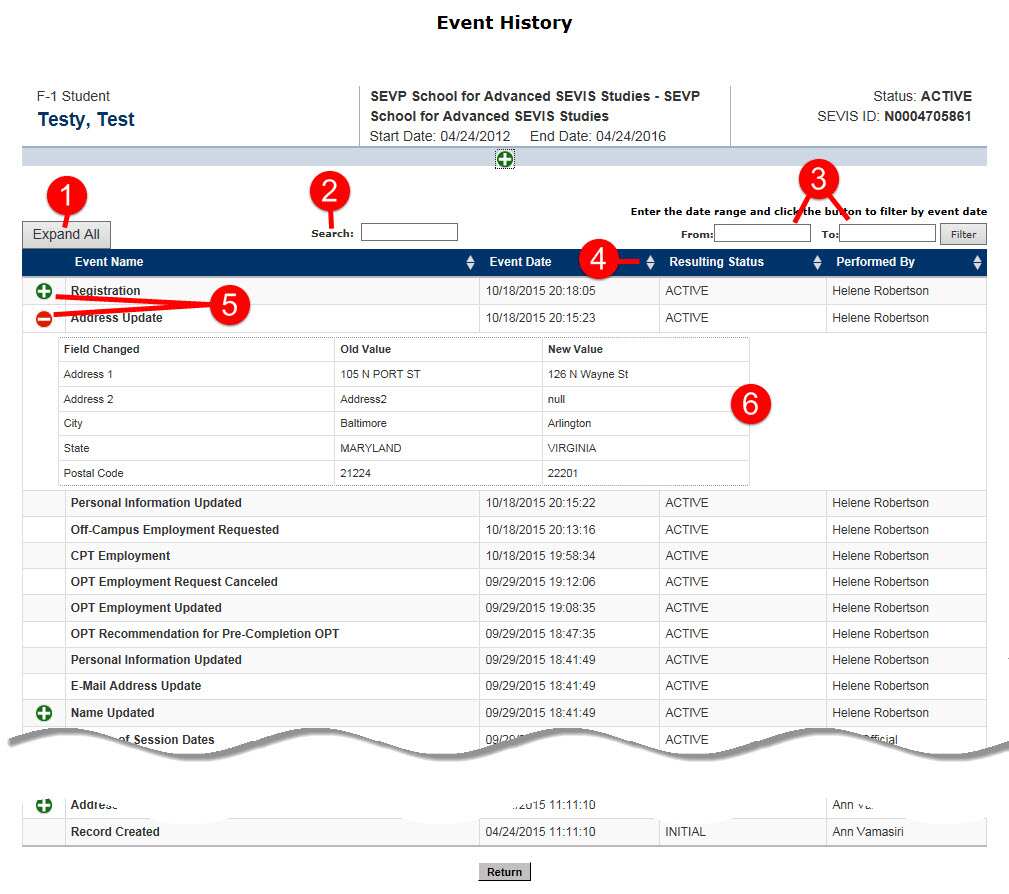
Event History Features
Feature Function
1. Expand All Expands all events in the Event History for which additional details are available.
2. Search 

Allows users to filter the list to only display certain types of events.

  • Enter the name of the type of events you want displayed.
  • SEVIS will begin to filter the list as you type.

Best Practice: Try to use terms that appear in the actual event names. Typing “practical training” will display nothing. Typing “OPT” will display only events relating to optional practical training. Typing “employment” will display events relating to any type of employment – OPT, CPT, or Off-campus employment.

3. From: and To: Date fields Allows the user to limit the list to events that happened between two specific dates.
4. Up and down arrows in the Column Headers
  • Allows the user to sort the list of the selected column in either ascending or descending order.
  • Click the Up or Down Arrow following the name of the column, which you want sorted.
5. Plus/Minus Sign Icon

Appears next to events that have additional details.

  • Click the Plus Sign to display more detail. SEVIS will expand the event listing to display values of changed fields. The icon changes to a Minus Sign.
  • Click the Minus Sign to hide the details.
6. Expanded event detail section Displays the before and after values of fields where data was changed. This allows for a better audit trail.
Icon - Pay attention to an important point
  • The ability to see more event details is available only for some events that occurred after December 4, 2015.
  • This feature will be expanded to more events with SEVIS Modernization.

3. Click Return at the top or bottom of the Event History page to return to the Student Information or Dependent Information page.

What's New

Chatbot

Try the Facebook Chatbot

Visit the tool on the Study in the States Facebook page to learn how to become an F or M international student in the United States.

Summer Employment

Learn About Summer Employment

While employed this summer, make sure you have all the relevant information on maintaining your student status, and the steps you must take before returning to school. 

Icon Guide

See the SEVIS Help Icons on the SEVIS Help Hub for a quick-reference of the icons used in this user guide.

I'm Looking For

Contact Us

Phone

SEVP Response Center

703-603-3400

Office

Monday - Friday 
8:00 a.m. to 6:00 p.m. ET,
except holidays

Was This Helpful?
Please provide feedback on this page.