SEVIS Help Hub illustration

SEVIS Help Hub

PDSO Record Correction

PDSO Record Correction

Last updated: December 7, 2023

Quick Links:

|

The principal designated school official (PDSO) can correct student SEVIS records in the following cases using the Corrections menu:

Situation PDSO Correction Action
Student’s record is in Cancelled status, but should be in Initial. PDSO can use the Return to Initial Status correction within 15 days of the record cancelation. 
Student’s record is in Active status, but should be in Initial.

PDSO can use the Return to Initial Status correction within 15 days of record registration.

Note: If the record contains any of the following requests, this PDSO record correction cannot be used:

  • Employment
  • Extension
  • Transfer out
  • Change of Education Level
Student’s program was not extended before Program End Date. PDSO can use the Extend Program correction up to 15 days after the Program End Date.
Student’s record was just transferred-in and student needs a transfer to another SEVIS-certified school.

PDSO can use the Transfer Out correction as long as the transferred-in record has not been registered and remains in Initial status.

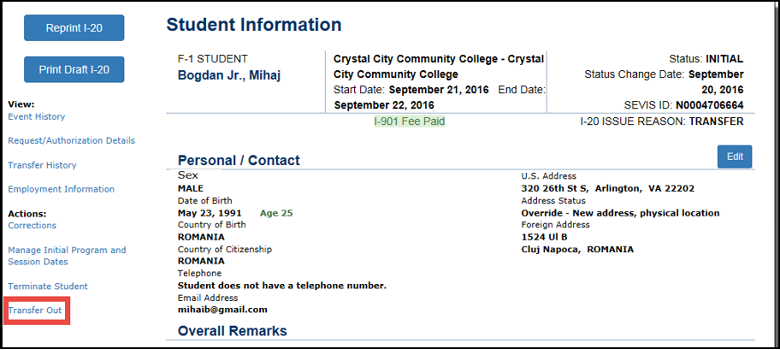
Note: This PDSO correction is found under the Actions menu on the Student Information page.

Icon - Pay attention to an important point
  • These corrections do not require SEVP Response Center adjudication. They are immediate. 
  • Only the PDSO can make these corrections. The links for these corrections do not display for designated school officials (DSOs).
  • All of these corrections will be reflected as a correction in the student’s Event History and in the school’s Data Correction Reports.
  • If a PDSO has missed the 15-day window for the first three corrections, the PDSO can correct the record by submitting a correction request to:
    • Change Student Status
    • Change to Program Dates 

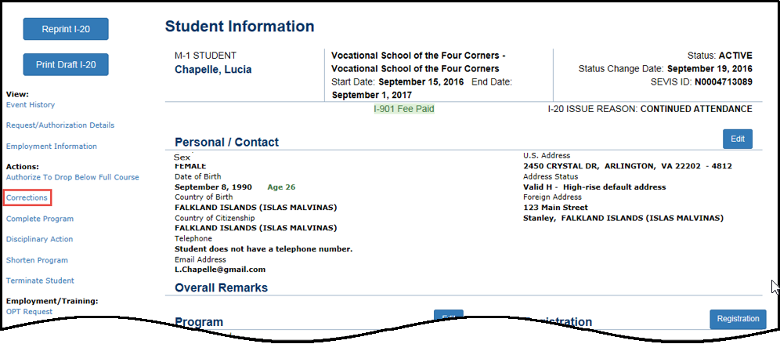
To return a Cancelled or Active record to Initial status:
  1. Go to the Student Information page.

Student Information Page

  2. Click Corrections. The Corrections Management page opens.

Corrections Management Page

3. Click Return to Initial Status. A confirmation message opens explaining the additional documentation that must be kept on file.

Confirmation Message

4. Click one of the following:

  • I Agree: Indicates the PDSO will maintain the appropriate supporting documentation and opens the Return to Initial Status page.
  • Cancel: Cancels the correction request and opens the Student Information page.
Student Information Page

5. On the Return to Initial Status page:

  • Complete the following required fields:
    • Issue Reason: Select the correct reason from the drop-down list.
    • Reason for Correction: Enter the explanation for the correction. (Explanation field allows 500 characters.)
  • Click one of the following:
    • Submit Correction: A message indicates the update was successful. Choose one of the option buttons:
      • Return to View Record: Returns user to Student Information page. The status is Initial.
      • Print I-20: Prints the Form I-20.
  • Reset Values: Returns the previous values to the fields.
  • Cancel: Cancels the Return to Initial Status correction request and opens the Student Information page.

Icon - Regulatory or policy resources

Before using this correction option, PDSOs should consult the regulations on program extensions, 8 CFR 214.2(f)(7)(i-iii).

Icon- best practice

The PDSO should take this opportunity to verify continued funding for the program extensions.

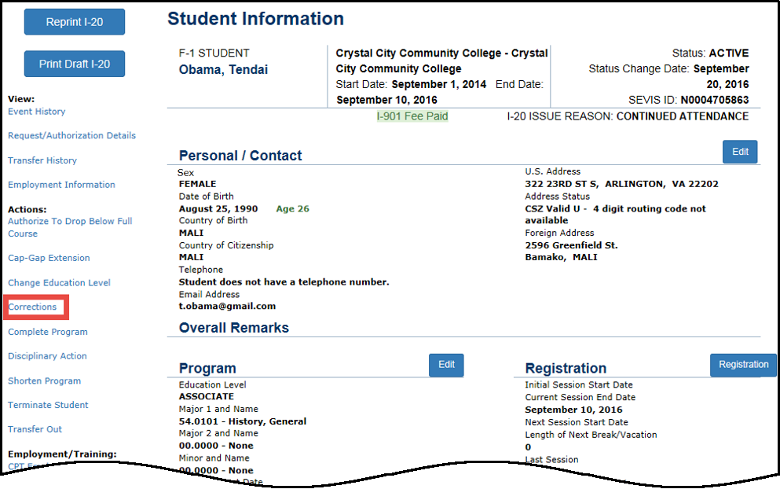
To extend the program within 15 days after the Program End Date:

1.      Go to the Student Information page.

Student Information Page

2. Click Corrections. The Corrections Management page opens. 

Corrections Management Page

3. Click Extend Program. A confirmation message appears explaining the additional documentation that must be kept.

Confirmation Message

4. Click one of the following:

  • I Agree: Indicates the PDSO will maintain the appropriate supporting documentation and opens the Extend Program page.
  • Cancel: Cancels the correction request and opens the Student Information page.
Student Information Page

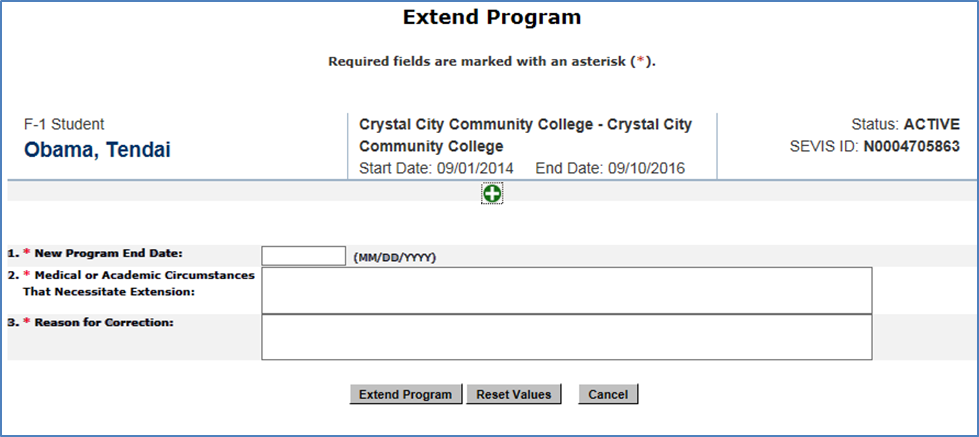
5. On the Extend Program page:

  • Complete the following required fields:
    • New Program End Date: Enter the student’s new Program End Date. (Format – MM/DD/YYYY
    • Medical or Academic Circumstance That Necessitate Extension: Enter the student’s medical condition or academic situation that requires an extension of the Program End Date. (Explanation field allows 500 characters.)
    • Reason for Correction: Enter the reason for the extension request. (Explanation field allows 500 characters.)
  • Click one of the following:
    • Extend Program: A message indicates the update was successful. Choose one of the option buttons:
      • Return to View Record: Returns user to Student Information page. 
      • Print I-20: Prints the Form I-20.
    • Reset Values: Deletes the values in the fields.
    • Cancel: Cancels the correction request and opens the Student Information page.

The PDSO at the transfer-in school may transfer F-1 students, who have just transferred-in, to a different school, as long as the student’s record remains in Initial status. DSOs do not have this ability. 

Icon - Pay attention to an important point
  • This PDSO correction is found under the Actions menu on the Student Information page.
  • The PDSO may correct the transfer only if the student is in Initial status and the transfer has not yet been completed in SEVIS. Once a student is registered, the transfer is marked complete, and the Transfer Out link in the Actions menu will not be available, even if the student is returned to Initial status.
Icon- best practice

When creating the Initial record from the transfer-in Draft status, enter the following for the required fields:

  • Primary Major: General Studies
  • Program Start Date: Today’s date
  • Program End Date: Tomorrow’s date
  • English Proficiency: Yes, Yes
  • Number of Months in Academic Term: 1
  • Tuition and Fees: 1
  • Living Expenses: 1
  • Student’s Personal Funds: 2

Once the record is in Initial status, the PDSO should:

1.      Go to the Student Information page.

Student Information Page

  2. Click Transfer Out. A confirmation message appears explaining the additional documentation that must be kept on file.

Confirmation Message

  3. Click one of the following:

  • I Agree: Indicates the PDSO will maintain the appropriate supporting documentation and opens the Transfer Out page.
  • Cancel: Cancels the correction request and opens the Student Information page.
Student Information Page

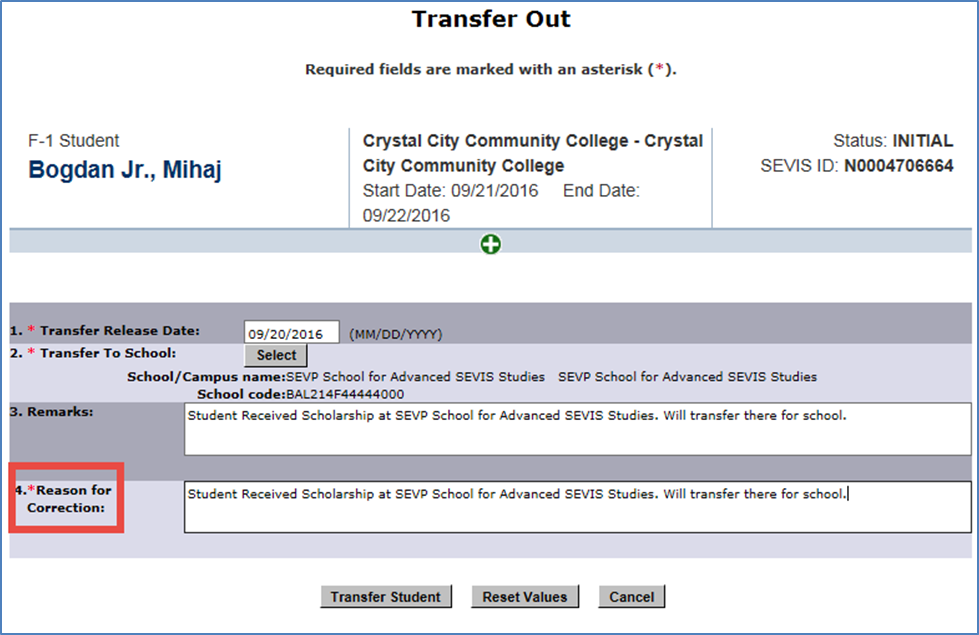
  4. On the PDSO correction Transfer Out page:

  • Complete the following required fields:
    • Transfer Release Date: Enter the student’s Transfer Release Date. (Format – MM/DD/YYYY)
    • Transfer To School: Click Select and enter the appropriate school.
    • Remarks: Enter an explanation for the transfer-out request. (Remarks field allows 500 characters.
    • Reason for Correction: Enter an explanation for the transfer-out request. (Explanation field allows 500 characters.)
Icon - Pay attention to an important point

SEVP recommends that you enter the same text in the Reason for Correction field that you enter in the Remarks field.

  • Click one of the following:
    • Transfer Student: A message indicates the transfer was successful.
    • Reset Values: Deletes the values in the fields.
    • Cancel: Cancels the transfer-out request and opens the Student Information page.

See the SEVIS Help Icons on the SEVIS Help Hub for a quick-reference of the icons used in this user guide.

What's New

Chatbot

Try the Facebook Chatbot

Visit the tool on the Study in the States Facebook page to learn how to become an F or M international student in the United States.

Summer Employment

Learn About Summer Employment

While employed this summer, make sure you have all the relevant information on maintaining your student status, and the steps you must take before returning to school. 

Icon Guide

See the SEVIS Help Icons on the SEVIS Help Hub for a quick-reference of the icons used in this user guide.

I'm Looking For

Contact Us

Phone

SEVP Response Center

703-603-3400

Office

Monday - Friday 
8:00 a.m. to 6:00 p.m. ET,
except holidays

Was This Helpful?
Please provide feedback on this page.