SEVIS Help Hub illustration

SEVIS Help Hub

COE (Form I-20) Mass Reprint

Breadcrumb

COE (Form I-20) Mass Reprint

Last updated: November 24, 2020

Quick Links:

|

Often designated school officials (DSO) need to reprint large numbers of Forms I-20, Certificates of Eligibility, at one time. The Reprint Certificate of Eligibility (Form I-20) option under the Mass Actions tab, along with the SEVIS Downloads functionality provides an easy method to complete this task.

Reprinting large numbers of Forms I-20 is a two-step process. First, the DSO must submit a request from the Listing of Schools page under the Mass Actions tab. SEVIS processes the request within 24 hours. When the requested Forms I-20 are available, the DSO completes the second step of downloading the documents from the SEVIS Downloads page.

1. Go to the Listing of Schools page.

Listing of Schools

2. Click Mass Actions. The SEVIS Mass Actions page opens.

Mass Reprint

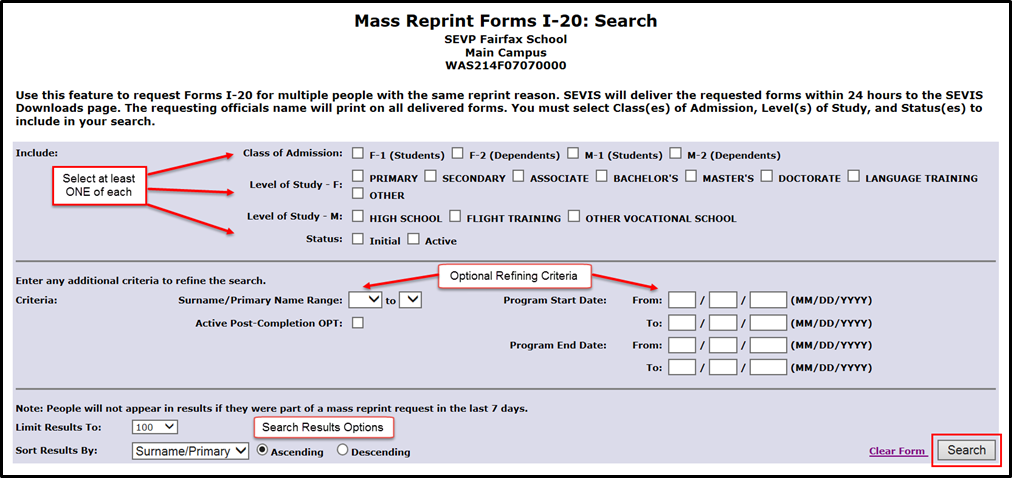
 3. Click the Reprint Certificate of Eligibility (Form I-20) link. The Mass Reprint Forms I-20: Search page opens.

Mass Reprint Forms

4. Select at least one option from each of the Include search categories:

  • Class of Admission – F or M student or dependent.
  • Level of Study – Type of school or degree.
  • SEVIS Status – Initial or Active.

  5. Enter additional criteria, if necessary, to refine the search:

  • Surname/Primary Name Range – Students and dependents whose surname/primary names begin with a certain letter or a range of letters.
  • Active Post-Completion OPT – Students currently authorized for post-completion OPT.
  • Program Start Date / Program End Date – Students with specific program start or end dates; or students who fall between ranges of these dates.

  6. Select a Limit Results To option for the number of records to appear in the search results. Choices are 100, 250, 500, or 1000.

  7. Select the desired Sort Results By option:

  • Surname/Primary Name (default option)
  • DOB (Date of Birth)
  • Given Name

  8. Select either Ascending or Descending sorted list. (Ascending is default option.)

  9. Click Search. The Mass Reprint Forms I-20: Search Results page opens.

Alerts
Icon- best practice

The list can be sorted by any column except Class of Admission (COA). To see which students had Forms I-20 reprinted recently, sort by Last Reprint Request Date.

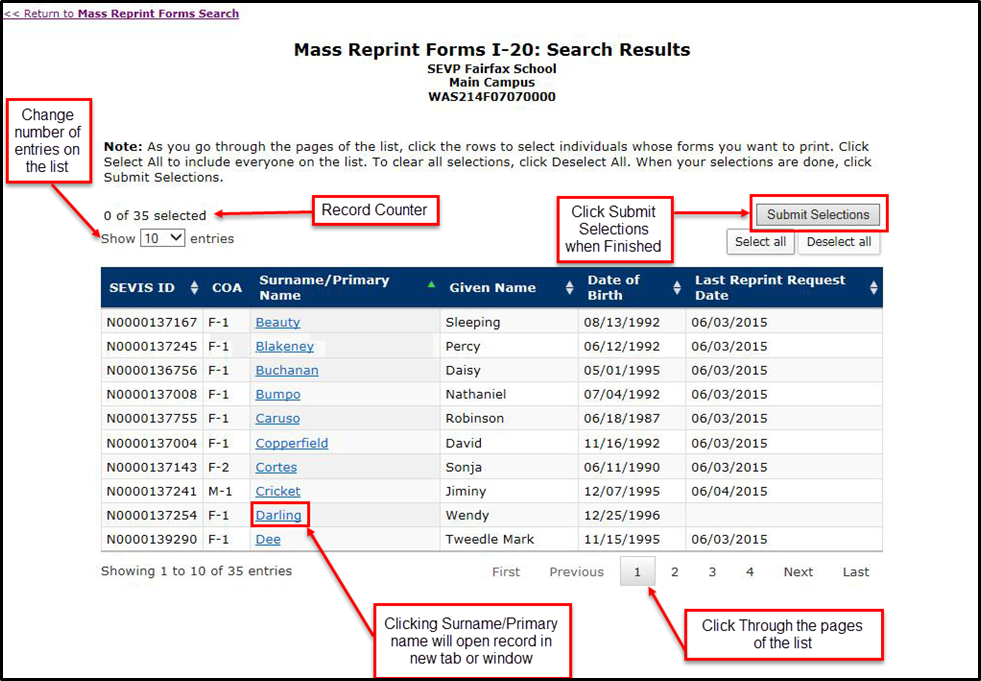
  10. View, select, and submit results for printing. The Mass Reprint Forms I-20: Search Results viewing and selection features include:

  • Click Show Entries drop-down list to change the number of entries displayed on page.
  • Click an Up or Down arrow in the table column-heading field to sort that field’s results in ascending or descending order.
  • Click a row to select that record for printing.

Note: Click selected row to deselect a record for printing.

  • Click Select All to include everyone on the list.
  • Click Deselect All to clear all selections.
  • Click the nonimmigrant’s name in the Surname/Primary Name field to open the record in another tab or window.
  • Navigate through the pages of the list using the page links at the bottom right.
  • Click Submit Selections after all selections are made. The Reprint Confirmation window opens.
Reprint Confirmation Window

11. Select a Reprint Reason from the drop-down list. Choices include:

  • Damaged
  • Lost
  • Stolen
  • Travel
  • Updated
  • Updated Form I-20 or Name Conversion

  12. Enter a title for the reprint job.

  13. Enter any remarks you want printed on all chosen students’ SEVIS records and in the          page one Remarks section of all Forms I 20 in this mass reprint job.

Remarks Section

14. Click I attest checkbox.

15. Click Submit when finished. SEVIS will deliver the requested forms to the SEVIS Downloads page within 24 hours.

The bottom of the SEVIS Downloads page lists the school’s mass reprint requests. Information about pending requests include the date submitted, date the reprint was generated, status of the request, title, number of records included, and who requested the forms. These forms are available here for all school users. Forms will stay on the page for seven days after delivery.

SEVIS Downloads

  1. Click the ZIP link for the zipped file you want to access. A dialogue box displays, asking if you want to Open, Save, or Cancel the file.

Zip

a. Open – Opens the file.

b. Save – Saves the file to your system.

c. Cancel – Ends the download process.

Icon - Pay attention to an important point

Requests for more than 100 records are split into multiple zip files. This avoids potential problems with downloading large files.

What's New

Chatbot

Try the Facebook Chatbot

Visit the tool on the Study in the States Facebook page to learn how to become an F or M international student in the United States.

Summer Employment

Learn About Summer Employment

While employed this summer, make sure you have all the relevant information on maintaining your student status, and the steps you must take before returning to school. 

Icon Guide

See the SEVIS Help Icons on the SEVIS Help Hub for a quick-reference of the icons used in this user guide.

I'm Looking For

Contact Us

Phone

SEVP Response Center

703-603-3400

Office

Monday - Friday 
8:00 a.m. to 6:00 p.m. ET,
except holidays

Was This Helpful?
Please provide feedback on this page.