SEVIS Help Hub illustration

SEVIS Help Hub

Complete Transfer of F-1 SEVIS Record

Breadcrumb

  1. Home
  2. SEVIS Help Hub
  3. Student Records
  4. Transfers
  5. Complete Transfer of F-1 SEVIS Record

Complete Transfer of F-1 SEVIS Record

Last updated: May 19, 2023

Quick Links:

|

When an F-1 student begins full-time studies at a new school, the student’s SEVIS record must be transferred to that new school, so the student’s original SEVIS ID and history is maintained in SEVIS.

This guide explains how to create the Transfer-Pending Certification of Eligibility (COE) (Form I-20) and complete the F-1 transfer-in process.

Resources

Icon - Specific text within a document applies only to F-1 schools or students

Before starting the transfer-in process, always check the F-1 transfer regulations and other SEVP guidance.

Icon - Pay attention to an important point

Review final SEVP guidance documents on the SEVP Schools and Programs page, which is under the Schools link of ICE.gov's Student and Exchange Visitor Program page. Scroll down to the expandable Policy Guidance section: 

Icon - Pay attention to an important point

For more information about the entire F-1 SEVIS record transfer process and timing, see:

Transfer Basics

The DSO at the transfer-out school sets the Transfer Release Date for an F-1 SEVIS record. That record will then appear on the Students Transferring In and the Draft Students lists at the transfer-in school. Once the Transfer Release Date has passed:

  • SEVIS deactivates the student record at the transfer-out school.
  • Create I-20 option appears under the Action section on the Student Information page at the transfer-in school.
  • Transfer-in school must create the COE (Form I-20) for transfer within 60 days.
Icon - Pay attention to an important point

Continue with the F-1 transfer process, even if:

  • The student is changing from one school to another for study in the same degree level, or for study in a different degree level after graduating from the transfer-out school.
  • The student will depart the United States before attending the transfer-in school, as long as the student will begin classes at the transfer-in school within five months.

Note: If the student will not begin classes at the transfer-in school within five months, the DSO should create a new SEVIS record and issue an Initial Attendance COE for the student.

When creating a Transfer-pending COE (Form I-20) for the transfer student, the incoming student must have:

  • Maintained a “full course of study” at the previous school.
  • Met all standards for admission.
  • Been admitted into a “full course of study” at your school.
Icon - Pay attention to an important point

If the student record was transferred to your school in Terminated status, for the F-1 student to regain lawful status, the transfer-in DSO must first create a Reinstatement Request I-20, and then the student must apply for reinstatement with the U.S. Citizenship and Immigration Services (USCIS).

Icon- best practice

The F-1 Transfer-pending COE (Form I-20) has two pages in SEVIS:

  • Create Certificate of Eligibility (Form I-20) for Transfer-In: Personal and Program Information page
  • Create Certificate of Eligibility (Form I-20) for Transfer-In: Financial Information page

Before you start, it is helpful to have the following student information for COE (Form I-20) creation:

  • Passport
  • Financial documentation
  • U.S. Address, Foreign Address, Email Address, and Phone Number
  • Education level and field of study Classification of Instructional Program (CIP) code
Icon - Pay attention to an important point

CIP codes are a list of numbers assigned to specific fields of study. The U.S. Department of Education (ED) manages this list to better track and report fields of study completion in the United States.

To create a Transfer-Pending COE (Form I-20) for the transfer student:

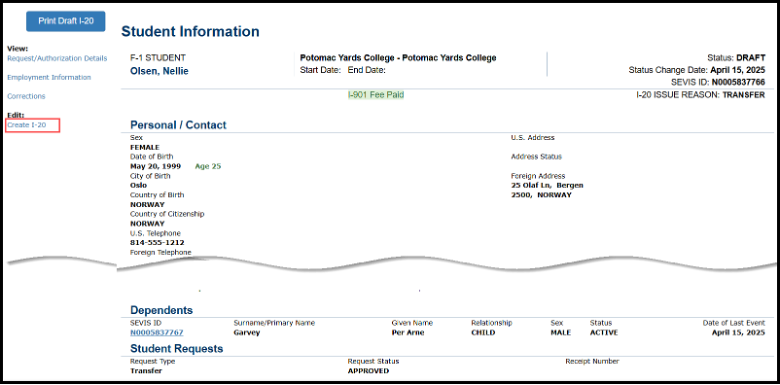
  1. Go to the Student Information page.
student info

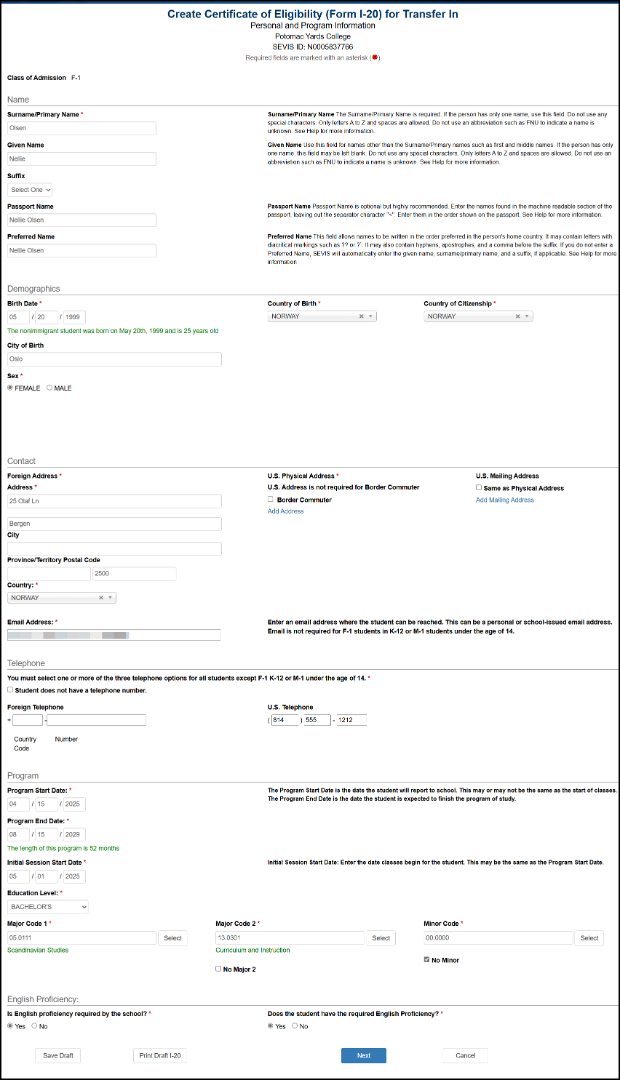
2. Click Create I-20. The Create Certificate of Eligibility (Form I-20) for Transfer-In: Personal and Program Information page opens. The SEVIS record will be in Draft status.

COE for Transfer-In: Personal and Program Information

The Create Certificate of Eligibility (Form I-20) for Transfer-In: Personal and Program Information page has six sections:

  • Name
  • Demographics
  • Contact
  • Telephone
  • Program
  • English Proficiency
student
Icon - Pay attention to an important point

SEVIS will populate the following COE (Form I-20) fields with the values from the transfer-out school. However, the DSO can and should edit most of those fields, if necessary.

  • Class of Admission (DSO cannot edit this field)
  • Form Issue Reason (DSO cannot edit this field)
  • Surname/Primary Name
  • Given Name
  • Suffix
  • Passport Name
  • Preferred Name
  • Birth Date
  • Gender
  • Country of Birth
  • Country of Citizenship
  • Foreign Address
  • Email Address
  • Telephone
  • Education Level

Note: All active dependent records will carry over with the Primary student’s SEVIS transfer

Name

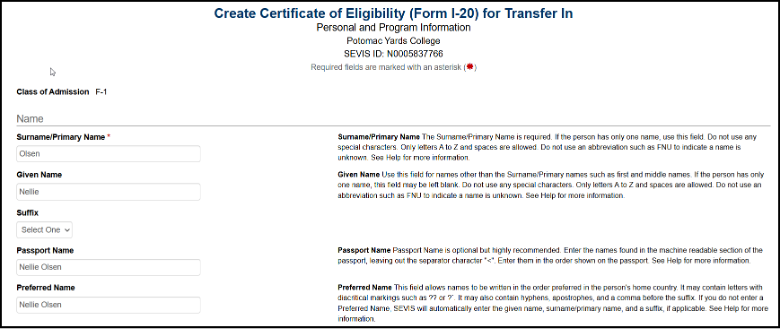
Update the fields in the Name section, if needed:

Create
Icon - Pay attention to an important point

See the SEVIS Help Hub article on SEVIS Names Standards for detailed names information

  • Surname/Primary Name
    • Enter the surname or primary name of the student. If the student has only one name, enter it in this field.
    • This field has a 80-character limit.
    • This is a required field.
    • DSOs must use the SEVIS Names Standards when creating records in SEVIS.
  • Given Name
    • Enter the given name of the student. If desired, include middle name of the student with the given name.
    • This field has an 80-character limit.
  • Suffix – If applicable, select a title from the drop-down list, such as Junior, which may display at the end of a person’s name.
  • Passport Name
    • Enter the name of the student, as written in the Machine-readable Zone (MRZ) of the passport.
    • This field has a 39-character limit.

Preferred Name 

  • Enter the preferred name of the student, in accordance with SEVIS Name Standards.          
  • This field has a 180-character limit.                       


Demographics

Update the fields in the Demographics section, if needed:

name
  • Birth Date
    • Enter the student’s date of birth in MM/DD/YYYY format.
    • This is a required field.
student name

Note: When entering the Birth Date, SEVIS shows the age of the student, as entered.

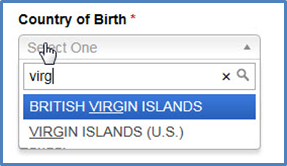
  • Country of Birth
    • Select the name of the student’s country of birth from the drop-down list.
    • This is a required field.
student

Note: For Country of Birth/Citizenship, searching by any word in country names field will filter the list.

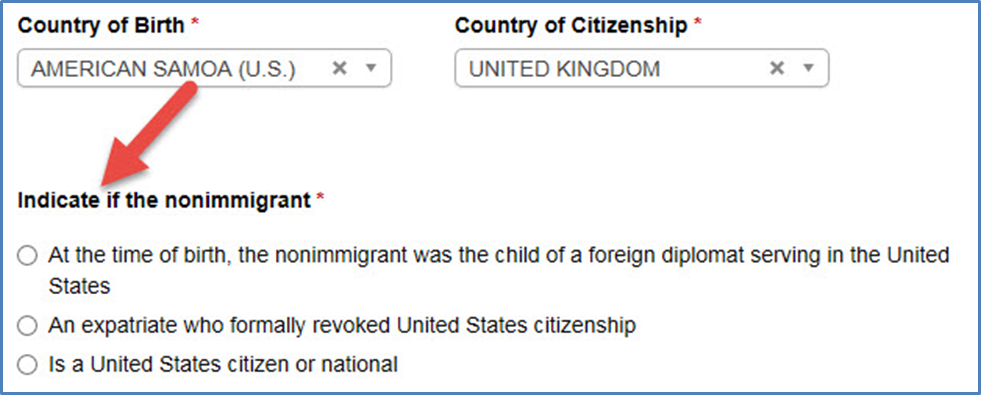
Note: For Country of Birth, selecting the United States or any of its territories requires clicking a radio button indicating the nonimmigrant is not a U.S. citizen or national.

country

Note: A validation error occurs if the Is a United States citizen or national radio button is selected. The error states that this person is not eligible for F or M status. The DSO must correct the country of birth or delete the draft COE (Form I-20).

alert
  • Country of Citizenship
    • Select the name of the student’s country of citizenship from the drop-down list.
    • This is a required field.
  • City of Birth
    • Enter the full name of the city where the student was born.
  • Gender
    • Select the student’s gender: Male, Female, or Unknown/Other.
    • This is a required field.

Contact

Complete or update the fields in the Contact section:

country
  • Foreign Address
    • Enter the student’s foreign address. All nonimmigrant students must have a foreign address, even if they are currently in the United States.
    • The Address and Country are required fields.
Icon - Pay attention to an important point

See the SEVIS Help Hub article on SEVIS Address Standards for detailed information.

  • U.S. Physical Address
    • Click Add Address to enter a U.S. address for the student, if they have one.
      • U.S. addresses are subject to validation.
      • U.S. Physical Address is required when creating the Transfer-pending COE (Form I-20).
Icon - Pay attention to an important point

If the transfer student does not have a permanent U.S. physical address, the DSO may enter the school’s address for COE (Form I-20) creation. 

Icon - Pay attention to an important point

The DSO must update the student's address once the student has a permanent U.S. address.


  • If the student is a commuter student whose Country or Citizenship is Mexico or Canada, click the Border Commuter checkbox. The U.S. address is not required for these students.
    • This is a required field
  • U.S. Mailing Address to enter a mailing address for the student, if they have one.
    • Click Add Mailing Address to enter a mailing address for the student, if they have one.
      • If the U.S. Mailing Address is the same as the U.S. Physical Address, click the Same as Physical Address checkbox to use the U.S. Physical Address.
  • Email Address
    • Enter a valid email address for the student
    • This is a required field

Note: U.S. addresses are subject to validation.

Icon - Specific text within a document applies only to elementary and secondary schools or students

Exception: An email address is not required for F-1 students in K-12. 

Icon - Pay attention to an important point

See the SEVIS Help Hub for detailed SEVIS Email Standards

Telephone

Complete one of the three fields in the Telephone section:

telephone
Icon - Pay attention to an important point

The Telephone is a required section, but DSOs are only required to provide information in one of the Telephone fields. 

  • Student does not have a telephone number: Click checkbox, if the student has told you they do not have a telephone number.
  • Foreign Telephone: Enter the country code and the phone number, if the student uses an international telephone number.
  • U.S. Telephone: Enter the area code and the phone number, if the studnet uses a U.S. telephone number.
Icon - Specific text within a document applies only to elementary and secondary schools or students

Exception: A telephone is not required for F-1 students in K-12. 

Program

Complete the fields in the Program section:

program
Icon - Pay attention to an important point

All program and session dates entered in SEVIS must correspond to your school’s academic calendar.

Program Start Date

  • Enter the date the student will begin his/her program at the transfer-in school
  • This may be the date of any required orientations or other activities before the start of classes.
  • This is a required field
Icon - Pay attention to an important point

Schools can choose to enter the Program Start Date and the Initial Session Start Date as the same date. If the dates differ, the Program Start Date cannot be more than 30 days before the Initial Session Start Date.

Program End Date

  • Enter the expected date of completion of the entire academic program, not the end of the academic session.
  • Do not consider grace periods or any future employment authorizations.
  • This is a required field
Icon - Specific text within a document applies only to elementary and secondary schools or students

When a student transfers from one public high school to another public high school, the new Program End Date may not exceed 12 months from the original Program Start Date.

Initial Session Start Date

  • Enter the date the student will begin classes at the transfer-in school
  • This is a required field
Icon - Pay attention to an important point

The Initial Session Start Date must be:

  • On or after the Program Start Date.
  • Whichever of the following is earlier:
    • Within five months of transferring out of the current school.
    • Within five months of the program completion date in the student’s current COE (Form I-20).

In the case of students authorized for post-completion optional practical training (OPT), the Initial Session Start Date must be whichever of the following is earlier:

  • Within five months of transferring out of the school that recommended the OPT.
  • Within five months of the date the OPT authorization ends, whichever is earlier.

Note: Regulatory registration deadlines and alerts are tied to the Initial Session Start Date.

  • Education Level
    • This field will be pre-populated with the value from the transfer-out school.
    • If necessary, update the Education Level field from the drop-down list with level of education the student will prusue at the transfer-in school. The options include:
    • Primary
      • Primary indicates the student is in grades K-8 at a private school, or its equivalent. 
        • Note: If you select Primary, SEVIS will enter a CIP code for “Primary School” (90.0101) into the Major Code 1 field automatically. This cannot be edited.
    • Secondary
      • Secondary indicates the student is in grades 9-12 at a private or public school, or their equivalent.
        • Note: If you select Secondary, there are a limited number of possible CIP codes from which to choose.
    • Associate
    • Bachelor's
    • Master's
    • Doctorate
    • Language Training
      • Note: If you select Language Training, SEVIS will enter the “Second Language Learning” CIP code (32.0109) into the Major Code 1 field automatically. This cannot be edited.
    • Other
      • Note: If you select Other, an If Other, enter here field appears. You must describe the Education Level here. This is a required field
  • Education Level must be selected before entering the Major codes. This is a required field.
Icon- best practice

Most post-secondary schools have a set list of CIP codes approved by the ED for their particular programs. Contact the CIP code coordinator (often called the (IPEDS Keyholder/Coordinator, and often someone in the Registrar’s Office) for the list of CIP codes approved for programs at your school. For more information about CIP codes see the National Center for Education Statistics site.

  • Major Code 1
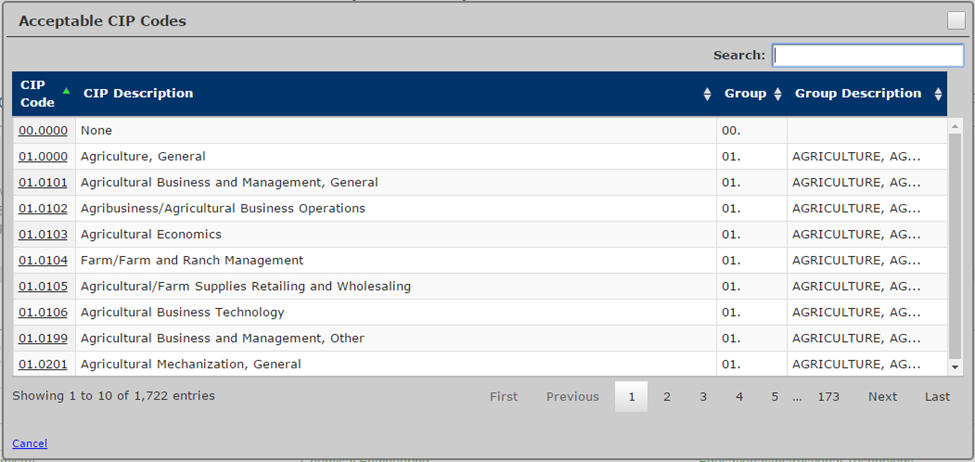
    • Enter the proper CIP code of the student’s primary major or use the search tool by clicking Select. The Acceptable CIP Codes modal opens.
students
  • Search for the CIP code by either:
    • Searching for a program family by code number followed by a period, for example, “14.” for the Engineering programs.
    • Entering search terms to find the appropriate CIP code, for example, Communications, Business, Engineering, etc.
  • After selecting a code, SEVIS will enter the CIP code in the Major Code 1 field.
  • This is a required field.
  • Note: You must select an Education Level before you can enter the Major code.


  • Major Code 2
    • Note: Some students have a secondary major, usually in a related field. Use this field for the secondary major CIP code.
      • Enter the CIP code of the student’s secondary major, or use the search tool by clicking Select. The Acceptable CIP Codes modal opens.
cip
  • Search for the CIP code by either:
    • Entering search terms to find the appropriate CIP code, for example, Communications, Business, Engineering, etc.
    • Searching for a program family by code number followed by a period, for example, “14.” for the Engineering programs.
      • After selecting a code, SEVIS will enter the CIP code in the Major Code 2 field.
      • If there is no second major, click the No Major 2 checkbox.
      • This is a required field.


  • Minor Code
    • Note: This field is used to select the CIP code for the student’s minor field of study.
      • Enter the CIP code of the student’s minor, or use the search tool by clicking Select. The Acceptable CIP Codes modal opens.
alert
  • Search for the CIP code by either:
    • Entering search terms to find the appropriate CIP code, for example, Communications, Business, Engineering, etc.
    • Searching for a program family by code number followed by a period, for example, “14.” for the Engineering programs.
      • After selecting a code, SEVIS will enter the CIP code in the Minor Code field.
      • If there is no minor, click the No Minor checkbox.
      • This is a required field.


English Proficiency

Icon - Regulatory or policy resources

Review final SEVP guidance documents on the SEVP Schools and Program page, which is under the Schools link of the ICE.gov Student and Exchange Visitor Program page. Scroll down to the expandable Policy Guidance section: 

Complete or update the fields in the English Proficiency section, if needed:

   1. In the English Proficiency section, answer the question “Is English proficiency required by the school?” Click either the Yes or No radio button:

  • Yes - Requires a further Yes or No confirmation that the student has the required English skills.
topic
Icon - Pay attention to an important point

If the school requires English proficiency and the DSO selects No for Does the student have the required English Proficiency, SEVIS will prevent the DSO from completing the COE (Form I-20). 

page

No - Requires an explanation on why the school does not require the student to be proficient in English.

english

 2. Click Next. The second page, Create Certificate of Eligibility (Form I-20) for Transfer-In: Financial Information, of the Transfer-pending COE (Form I-20) creation process opens. 

COE for Transfer-In: Financial Information

Students must provide proof that they have the financial resources to live and study in the United States. On the Create Certificate of Eligibility (Form I-20) for Transfer-In: Financial Information page, enter information about the student’s expenses and funding for an academic year or the length of the program, whichever is shorter.

There are four sections on the Financial Information page:

  • Financial
  • Expenses
  • Funding
  • Remarks about the Student

When the Financial Information page opens for the transfer-in student, the fields are blank.

Certificate of Eligibility

Financial

Enter the number of months (up to 12 months) for the estimated costs and funding in the Financial section. 

Financial
  • Use the drop-down list in the Estimated costs and funding for*__ months field to select the number of months for estimating expenses and sources of funding.
  • Estimates should be for the length of the program or for an academic year (whichever is shorter).
  • This is a required field.

Expenses

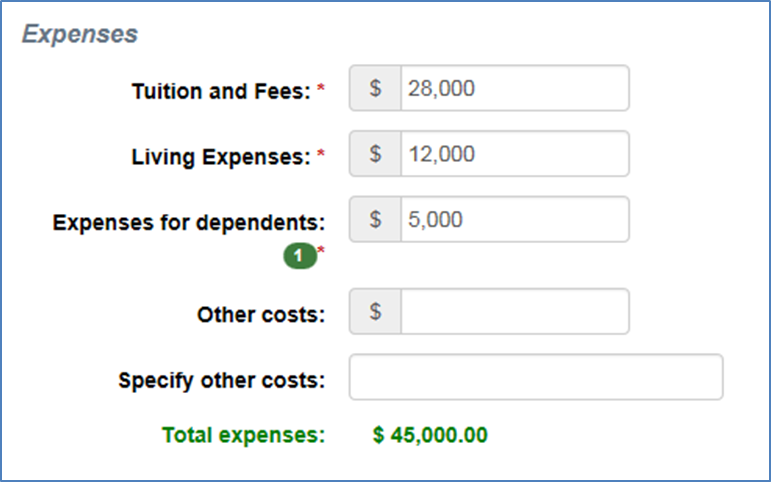
Complete the fields in the Expenses section:

Expenses
  • Tuition and Fees
    • Enter the amount for the student’s tuition and fees.
    • This is a required field.
  • Living Expenses
    • Enter the amount of the student’s expenses for living in the United States while attending your school.
    • This is a required field.
  • Expenses for Dependents
    • Enter the amount of expenses for any dependents.
    • The number of dependents currently associated with the student displays by the field name.
    • This is a required field.
Icon- Specific text within a document applies only to dependents

All F-2 dependent records tied to the F-1’s SEVIS record at the transfer-out school will transfer with the F-1’s SEVIS record. SEVIS requires financial information for any transferring dependents

  • Other Costs – Enter any other costs for the months of estimated expenses.
  • Specify Other Costs – Enter the reason for any other costs.
  • Total Expenses – SEVIS calculates the costs and displays the total expenses at the bottom of the Expenses section.

Funding

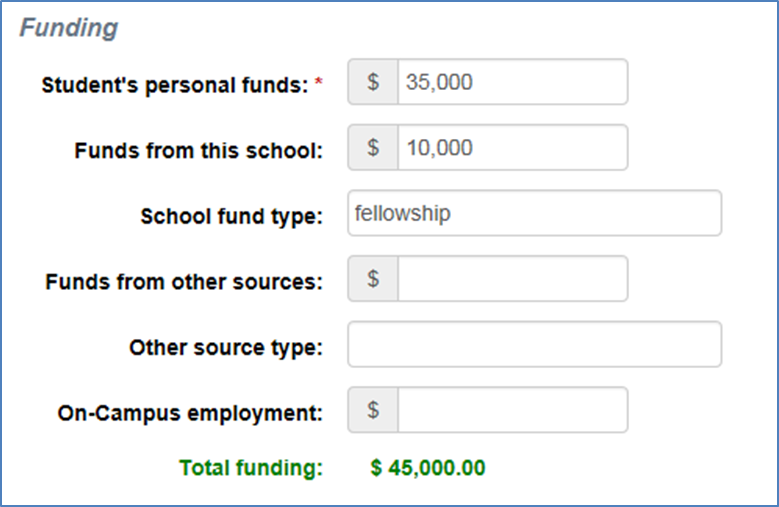
Complete the fields in the Funding section:

funding
  • Student’s Personal Funds
    • Enter the amount of the student’s own personal funds.
    • This is a required field.
  • Funds from this School – Enter the amount of any funding offered by your school.
  • School Fund Type – Enter the type of school fund offered by your school, for example, an academic scholarship.
  • Funds from Other Sources – Enter the amount of any funding from any other sources.
  • Other Source Type – Enter the type of funding from any other sources, for example, a parent, aunt/uncle, or private grant/scholarship.
  • On-Campus Employment – Enter the amount the student is expected to earn through any on-campus employment at your school.
  • Total Funding – SEVIS calculates and displays the student’s total funds at the bottom of the Funding section.

Note: The student’s total funds must meet or exceed the expenses, before the DSO may issue the student’s Initial COE (Form I-20).

Remarks about the Student

Enter any comments about the student in the Remarks about the Student field:

coe
  • These remarks will print on the COE (Form I-20).
  • This field has an 80-character limit.

Save Draft I-20

To save a draft copy of the COE (Form I-20), click Save Draft at the bottom of the page. 

coe

Note: The Save Draft button is available at the bottom of each of the two Create Certificate of Eligibility (Form I-20) for Transfer-In pages, Personal and Program Information and Financial Information.

Note: Other buttons available at the bottom of the COE pages:

  • Prev
    • Returns the user to the previous COE page.
    • If entries are not saved on the current page before clicking the Prev button, any information entered will need to be re-entered.
  • Cancel
    • Cancels the COE (Form I-20) creation.
    • Returns the user to the Student Information page.

Print Draft I-20

To print a draft copy of the COE (Form I-20), click Print Draft I-20 at the bottom of the page.

Note: The Print Draft I-20 button is available at the bottom of each of the two Create Certificate of Eligibility (Form I-20) for Transfer-In pages, Personal and Program Information and Financial Information.


Issue and Print F-1 COE (Form I-20) For Transfer-In

To issue and print the Transfer-pending COE (Form I-20):

To issue and print the Transfer-pending COE (Form I-20):

text

 1. Click Submit at the bottom of the Financial Information page to submit the student’s Transfer-pending COE (Form I-20). The Submit Successful page opens.

submit

 2. Click:

  • Print I-20: Prints the Transfer-pending COE (Form I-20) for the F-1 Transfer-In student and his/her dependents.
Icon - Regulatory or policy resources
Icon- best practice
  • Once the Form I-20 has been submitted, the DSO must sign page one of the form.
  • Students are expected to keep all Forms I-20 issued during their academic career.
  • When information on the Form I-20 changes, it is best to give a new copy to the student.
  • Find more information on allowable electronic signatures and Form I-20 transmission in SEVP’s policy guidance Use of Electronic Signatures and Transmission for the Form I-20.
  • Go to Student Information Page: Goes to the Student Information page to view the student's newly entered information.
Icon - Pay attention to an important point
  • The Form Issue Reason on the COE (Form I-20) will be Transfer Pending – [Name of Transfer out School].
  • Nonimmigrant students may travel outside and return to the United States with a Transfer-pending COE (Form I-20).
    • If the F-1 visa in the student’s passport is still valid, the student can use that visa with your Transfer-Pending COE (Form I-20) to re-enter the United States.
    • If the F-1 visa is expired, the student will need the Transfer-pending COE (Form I-20) issued by your school to apply for a new F-1 visa.

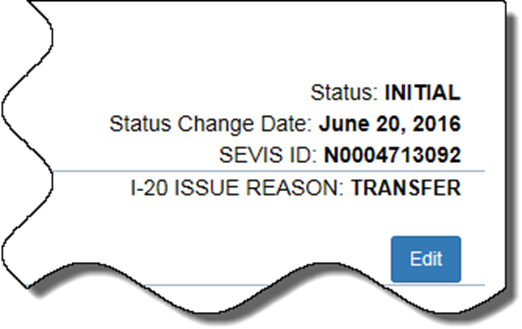
When the DSO creates the Transfer-Pending COE (Form I-20), the Student Information page at the transfer-in school shows:

  • SEVIS record status will be Initial.
  • I-20 Issue Reason will be Transfer.
initial

The F-1 SEVIS transfer will remain pending until the DSO completes the SEVIS registration for the transfer student. 

Icon - Pay attention to an important point
  • The student must report to the DSO at the transfer-in school within 15 days of beginning attendance at the new school. 
  • Upon the initial registration at the transfer-in school, the DSO notes “Transfer Completion” and the date in the Remarks about the Student field.
Icon- best practice
  • Students are expected to keep all Forms I-20 issued during their academic career.
  • When information on the Form I-20 changes, it is best to give a new copy to the student.
  • Find more information on allowable electronic signatures and Form I-20 transmission in SEVP’s policy guidance Use of Electronic Signatures and Transmission for the Form I-20.
Icon - Pay attention to an important point

For more information on student registration, see Registration on the SEVIS Help Hub.

See the SEVIS Help Icons on the SEVIS Help Hub for a quick-reference of the icons used in this user guide.

What's New

Chatbot

Try the Facebook Chatbot

Visit the tool on the Study in the States Facebook page to learn how to become an F or M international student in the United States.

Summer Employment

Learn About Summer Employment

While employed this summer, make sure you have all the relevant information on maintaining your student status, and the steps you must take before returning to school. 

Icon Guide

See the SEVIS Help Icons on the SEVIS Help Hub for a quick-reference of the icons used in this user guide.

I'm Looking For

Contact Us

Phone

SEVP Response Center

703-603-3400

Office

Monday - Friday 
8:00 a.m. to 6:00 p.m. ET,
except holidays

Was This Helpful?
Please provide feedback on this page.