SEVIS Help Hub illustration

SEVIS Help Hub

Reinstatement COE (Form I-20)

Breadcrumb

Reinstatement COE (Form I-20)

Last updated: January 18, 2023

Quick Links:

|

Designated school officials (DSO), Department of Homeland Security (DHS) adjudicators, and the Student and Exchange Visitor Information System (SEVIS) terminate student records for many reasons. Sometimes DSOs must help a student regain Active status in SEVIS after the record was terminated or completed.

Options to Regain Active Status in SEVIS

This chart gives a brief overview of three functions that can be used for students to regain Active status in SEVIS. The DSO must decide which option is most appropriate. This document focuses on the reinstatement process. Use the hyperlinks to learn more about the other processes.

Action Use When
Correction Request to Change Student Status Student record was terminated due to administrative or technical errors.
Reinstatement The student:
  • Failed to maintain the terms of his or her immigration status; therefore, a DSO terminated the record as a result.
  • Will resume full-time study.
  • Can prove eligibility for reinstatement according to F-1 or M-1 regulations.
Leave the United States and re-enter on a new SEVIS record 
  • The student is not eligible for reinstatement. For example, the student worked without permission.

Or

  • The student cannot wait for the time it takes the U.S. Citizenship and Immigration Services (USCIS) to decide a reinstatement case. 

Note: For this option, the student must both:

  • Get a new SEVIS number and a new Form I-20.
  • Pay the I-901 SEVIS Fee again.
Note: For more information, see the regulations at 8 CFR 214.2(f)(8)(i).

Reinstatement Eligibility, Regulations and Policy Guidance

DSOs must know the regulations and policies that apply to reinstatement for lawful immigration status.

In general, to be eligible for reinstatement, the student must:

  • Not be out of status for more than five months at the time of filing or show the exceptional circumstance that prevented filing in that time frame.
  • Not have a record of repeated or willful violations of regulations.
  • Not have worked without authorization.
  • Be pursuing or intend to pursue a full course of study in the immediate future at your school.
  • Not be deportable for any reason other than failing to maintain F-1 or M-1 status.
  • Be able to show that:
    • Circumstances beyond the student’s control caused the status violation.
    • Student fell below a full course load for a reason the DSO could have used to authorize a reduced course load, and the student would experience extreme hardship, if the student fails to get reinstatement.
Icon - Regulatory or policy resources

Read the full reinstatement regulations to understand the specific eligibility criteria and what the student needs to provide to USCIS:

  • F-1 reinstatement: 8 CFR 214.2(f)(16).
  • M-1 reinstatement: 8 CFR 214.2(m)(16)

Process at a Glance

The reinstatement process in SEVIS is simple; but it can take USCIS some time to adjudicate.

Step Player Action
1 DSO
  • Recommends reinstatement in SEVIS.
  • Prints and signs the Form I-20, Certificate of Eligibility for Nonimmigrant Student Status, issued for reinstatement.
2 Student Note: The Form I-539, Instructions for Application to Extend/Change Nonimmigrant Status, lists the required documents to submit with the Form I-539.
Note: If the student has been out of status for more than five months, he or she must also:
  • Pay the SEVIS I-901 fee again.
  • Explain why the reinstatement application could not be filed sooner.
3 USCIS
  • Accepts/rejects the application.
  • Makes a decision and mails it to the student.
Note: USCIS may request additional information. USCIS will send all correspondence related to the application to the mailing address on the Form I-539.
3a SEVIS
  • SEVIS automatically emails the decision to the DSO who requested the reinstatement and to the PDSO.
  • If approved for reinstatement to a continuing program, SEVIS changes the status of the record to Active.
4 Student
  • If approved for reinstatement to a new program, the student enrolls for the program, as indicated on the Form I-20.
  • If approved for reinstatement to a continuing program, the student resumes a full course of study, if he or she has not already done so.
  • If denied, the student follows the instructions in the denial notice.
4a DSO
  • If approved for reinstatement to a new program, the DSO must follow the registration processes for the initial session at the school.
  • If approved for reinstatement to a continuing program, the DSO must register the student within 30 days and make sure the session dates are correct. 
Note: SEVIS will terminate the record for failure to enroll, if the Initial or Next Session Start Date is past the regulatory deadline.
4b SEVIS If denied, SEVIS closes the reinstatement request.

Reinstatements and the “Five-Month Deadline”

A student can file for reinstatement at any time. These cases are harder if more than five months have passed since the record terminated or completed. If the student is: 

  • Within the first five months, the student must explain:
    • Why the record was terminated.
    • How the student plans to maintain F-1 or M-1 status.
  • After the five-month mark, the student must:
    • Pay the I-901 SEVIS Fee.
    • Explain:
      • Why the record was terminated.
      • Why her or she could not file within the first five months. 
      • How the student plans to maintain F-1 or M-1 status.

The “Students Nearing Reinstatement Deadline” Alert List helps DSOs monitor potential cases, which are exempt from another I-901 SEVIS Fee and that still qualify for reinstatement in the lower threshold of the first five-month timeframe.

Alerts and Student Lists

SEVIS provides two lists to help DSOs manage students who may need to be or have been recommended for reinstatement.

Icon- additional information is available

Read the SEVIS Help Hub article on Alerts and Lists to learn how to use alerts and lists.

Alert List: Terminated Students Nearing Their Reinstatement Deadline

This alert list includes student records terminated between 90 to 150 days ago. The list includes the students’:

  • SEVIS ID
  • Class of Admission
  • Surname/Primary Name 
  • Given Name
  • Termination Date
  • Termination Reason
Terminated Students Nearing Their Reinstatement Deadline

Student List: Students Requesting Reinstatement

This list includes the students that the DSO has requested reinstatement for; but whose reinstatement requests are pending approval by USCIS. The list includes the following for each student:

  • SEVIS ID
  • Class of Admission
  • Surname/Primary Name 
  • Given Name
  • Date of Request
Students Requesting Reinstatement

Reinstatement recommendations have two SEVIS pages:

  • Student Reinstatement: Contact and Program Information page
  • Student Reinstatement: Financial Information page

To recommend reinstatement:

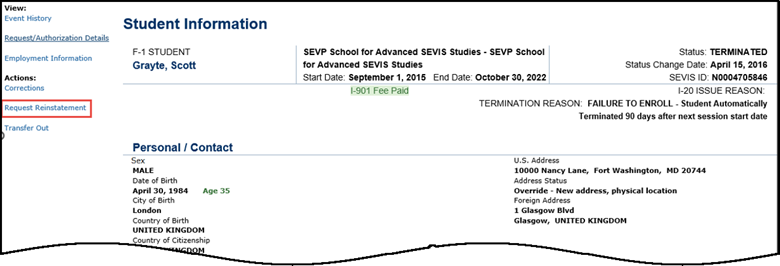
  1. Go to the Student Information page for the student.
Student Information Page

  2. Click Request Reinstatement link on the left side of the page. The Student Reinstatement: Contact and Program Information page opens.

Student Reinstatement: Contact and Program Information Page

Student Reinstatement

The Student Reinstatement: Contact and Program Information page has four sections:

  • Contact
  • Telephone
  • Program
  • English Proficiency

The fields on this page will display any existing information. The fields can be edited.

Contact

Complete or update the fields in the Contact section, if needed:

Contact Page
  • Foreign Address*
    • Enter the student’s foreign address. All nonimmigrant students must have a foreign address, even if they are currently in the United States.
    • The Address and Country are required fields.
  • U.S. Physical Address
    • Click Add Address to enter a U.S. address for the student, if they have one. 
      • U.S. addresses are subject to validation. 
      • The U.S. physical address is required for students seeking reinstatement. 
    • If the student is a commuter student whose Country of Citizenship is Mexico or Canada, click the Border Commuter checkbox. The U.S. address is not required for these students.
Icon- additional information is available

See the SEVIS Help Hub article on SEVIS Address Standards for detailed information.

  • U.S. Mailing Address
    • Click Add Mailing Address to enter a mailing address for the student, if they have one.

Note: U.S. addresses are subject to validation.

  • If the U.S. mailing address is the same as the U.S. physical address, click the Same as Physical Address checkbox.
Icon- additional information is available

See the SEVIS Help Hub article on SEVIS Address Standards for detailed information.

Email Address – Enter a valid email address for the student.

Icon- additional information is available

See the SEVIS Help Hub article on SEVIS Email Standards for detailed information.

Telephone

Complete or update the three fields in the Telephone section, if needed:

Telephone Complete or update the three fields in the Telephone section, if needed:

Note: DSOs are required to provide information in only one of these fields:

  • Student does not have a telephone number – Click checkbox, if the student has told you they do not have a telephone number.
  • Foreign Telephone – Enter the country code and the phone number, if the student uses an international telephone number.
  • U.S. Telephone – Enter the area code and the phone number, if the student uses a U.S. telephone number.

Note: Telephone is not required for F-1 students in K-12 or M-1 students under the age of 14.

Program

Complete or update the fields in the Program section:

Program Section
Icon - Pay attention to an important point

All program and session dates entered in SEVIS must correspond to your school’s academic calendar.

  • Program Start Date*
    • Enter the date that the student will begin his or her program. This date does not change if the student is continuing to pursue the same original program.
    • This may be the date of any required orientations or other activities before the start of classes.
    • This is a required field.
Icon- additional information is available

Schools can choose to enter the Program Start Date and the Initial Session Start Date as the same date. In any case, the Program Start Date cannot be more than 30 days before the Initial Session Start Date.

  • Program End Date*
    • Enter the expected date of completion of the academic or vocational program. 
    • Do not consider grace periods or any future employment authorizations. 
    • This is a required field.

Initial Session Start Date*

  • Enter the date that the student will begin classes. 
  • This date cannot be more than 30 days from the Program Start Date.
  • This is a required field.
  • SEVIS allows DSOs to enter a date in the past.

Note: Registration deadlines and alerts are tied to this date.

Education Level*

Select the level of education pursued by the student from the drop-down list. The options include:

  • Primary: Primary indicates the student is in grades K-8 at a private school, or its equivalent.

Note: If you select Primary, SEVIS will automatically enter the classification of instructional program (CIP) code for “Primary School” (90.0101) into the Major Code 1 field. This cannot be edited.

Icon- additional information is available

Classification of Instructional Programs (CIP) codes are a list of numbers assigned to specific fields of study. The U.S. Department of Education (ED) manages this list to better track and report fields of study completion in the United States.

  • Secondary: Secondary indicates the student is in grades 9-12 at a private or public school, or their equivalent.

Note: If you select Secondary, there are ten acceptable CIP codes. 


(1)    Click Select under the Major Code 1 field to display the acceptable CIP codes.
(2)    Select the CIP code number link for the desired code. 

  • Associate
  • Bachelor’s
  • Master’s
  • Doctorate
  • Language Training

Note: If you select Language Training, SEVIS will enter the “Second Language Learning” CIP code (32.0109) into the Major Code 1 field automatically. This cannot be edited.

  • Other

Note: If you select Other, an If Other, enter here field appears. You must describe the education level here. This is a required field.

Icon - Specific text within a document applies only to M-1 vocational/technical schools or students

DSOs can only choose from three levels of education for M-1 students who seek reinstatement:

  • High School
  • Flight Training
  • Other Vocational School
  • Level of education must be selected before entering the Major codes.
  • This is a required field.
 
Icon- best practice
  • Most post-secondary schools have a set list of CIP codes approved by ED for their particular programs. Contact the CIP code coordinator (often called the (IPEDS Keyholder/Coordinator, who is usually someone in the Registrar’s Office) for the list of CIP codes approved for programs at your school.
  • For more information about CIP codes see the National Center for Education Statistics site.
  • Major Code 1*
    • Enter the CIP code of the student’s primary major or use the search tool by clicking Select. The Acceptable CIP Codes window opens. 
Acceptable CIP Codes portal  Acceptable CIP Codes portal
  • Search for the CIP code by either:
    • Entering search terms to find the appropriate CIP code, for example, Communications, Business, Engineering, etc.
    • Searching for a program family by code number followed by a period, for example, “14.” for the Engineering programs.
  • After selecting a code, SEVIS will enter the CIP code in the Major Code 1 field.
  • This is a required field.

Note: You must select an Education Level before you can enter the Major code.

  • Major Code 2*

Note: Some students have a secondary major, usually in a related field. Use this field for the secondary major CIP code. 

  • Enter the CIP code of the student’s secondary major or use the search tool by clicking Select. The Acceptable CIP Codes window opens. 
Acceptable CIP Codes portal
  • Search for the CIP code by either: 
    • Enter search terms to find the appropriate CIP code, for example, Communications, Business, Engineering, etc. 
    • Search by the code family, for example, “14.” for the Engineering programs.
  • After selecting a code, SEVIS will enter the CIP code in the Major Code 2 field.
  • If the student does not have a second major, click the No Major 2 checkbox.
  • This is a required field.
     
  • Minor Code*

Note: This field is used to select the CIP code for the student’s minor field of study. 

  • Enter the CIP code of the student’s minor program, or use the search tool by clicking Select. The Acceptable CIP Codes modal opens. 
Acceptable CIP Codes portal
  • Search for the CIP code by either:
    • Entering search terms to find the appropriate CIP code, for example, Communications, Business, Engineering, etc.
    • Searching for a program family by code number followed by a period, for example, “14.” for the Engineering programs.
  • After selecting a code, SEVIS will enter the CIP code in the Minor Code field.
  • If the student does not have a minor, click the No Minor checkbox.
  • This is a required field.

English Proficiency

Icon - Regulatory or policy resources

Review final guidance documents on the SEVP Schools and Program page, under the Overview tab and Policy section on ICE.gov website:

Complete or update the fields in the English Proficiency section, if needed: 

  1. In the English Proficiency section, answer the question “Is English proficiency required by the school?” Click either the Yes or No radio button: 
  • Yes – Requires a further Yes or No confirmation that the student has the required English skills. 
Proficiency Page
Icon - Pay attention to an important point

 If the school requires English proficiency and the DSO selects No for Does the student have the required English Proficiency, SEVIS will prevent the DSO from completing the Form I-20.

English Proficiency section with yellow error message prohibiting further I-20 creation.

No – Requires an explanation on why the school does not require the student to be proficient in English.

Proficiency Page

2. Click Next. The Student Reinstatement: Financial Information page, the second page of the Reinstatement workflow opens.

Student Reinstatement: Financial Information Page

Students must provide proof that they have the financial resources to live and study in the United States. On the Student Reinstatement: Financial Information page, enter or update information about the student’s expenses and funding for an academic year or the length of the program, whichever is shorter.
There are four sections on the Financial Information page: 

  • Financial
  • Expenses
  • Funding
  • Remarks about the Student

The fields on this page will display any existing information. It can be edited.

Student Reinstatement

Financial

Enter or update the number of months (up to 12 months) for the estimated costs and funding in the Financial section.

Financial Section
  • Use the drop-down list in the Estimated costs and funding for*__ months field to select the number of months for estimating expenses and sources of funding. 
  • Estimates should be for the length of the program or for an academic year, whichever is shorter.
  • This is a required field.

Expenses

Complete or update the fields in the Expenses section:

Expenses Section
  • Tuition and Fees
    • Enter the amount for the student’s tuition and fees. 
    • This is a required field.
  • Living Expenses
    • Enter the amount for the student’s living expenses. 
    • This is a required field.
  • Expenses for Dependents
    • Enter the amount of expenses for any dependents. 
    • The number of dependents currently associated with the student displays by the field name. 
    • This is a required field.
  • Other Costs – Enter any other costs for the months of estimated expenses.
  • Specify Other Costs – Enter the reason for any other costs.
  • Total Expenses – SEVIS calculates the costs and displays the total expenses at the bottom of the Expenses section

Funding

Complete or update the fields in the Funding section:

Funding Section
  • Student’s Personal Funds* 
    • Enter the amount of the student’s personal funds.
    • This is a required field.
  • Funds from this School – Enter the amount of any funding offered by your school.
  • School Fund Type – Enter the type of school fund offered by your school, for example, an academic scholarship.
  • Funds from Other Sources – Enter the amount of any funding from any other sources. 
  • Other Source Type – Enter the type of funding from any other sources, for example, a private grant.
  • On-Campus Employment – Enter the amount of funding from the student’s on-campus employment.
  • Total Funding – SEVIS calculates and displays the student’s total funds at the bottom of the Funding section.

Note: The student’s total funds must meet or exceed the expenses, before the DSO may issue the student’s Reinstatement Form I-20.

Remarks about the Student

Enter any comments about the student in the Remarks about the Student field:

Student Remarks Section
  • These remarks will print on the Form I-20. 
  • This field has a 1000-character limit.

After entering any necessary information, submit the request to SEVIS:
  1. Click either Prev, Cancel, or Request Reinstatement at the bottom of the page.

  • Prev – Returns the user to the Student Reinstatement: Contact and Program Information page.
  • Cancel – Returns the user to the Student Information page without changing any information and without requesting reinstatement.
  • Request Reinstatement – Submits the request with any changes.

  2. If Request Reinstatement was selected, the Update Successful page displays with two options, Return to View Record or Print I-20.

Update Successful
  • Return to View Record – Returns the user to the Student Information page.
  • Print I-20 – Generates the PDF of the form that can be printed.

Reinstatement requests cannot be edited. If the student has not sent the application to USCIS, cancel the request in SEVIS and submit a new one.

DSOs occasionally have to cancel reinstatement requests in SEVIS. Mostly, this happens when:

  • A student decides not to pursue reinstatement and has not sent the reinstatement application to USCIS.
  • A DSO wrongly submitted a reinstatement request, instead of a correction request to change the student’s status.
Icon - Negative consequence

Do not cancel a reinstatement request that has already been sent to USCIS. Requests pending with USCIS must be formally withdrawn using USCIS procedures.

To cancel a reinstatement:
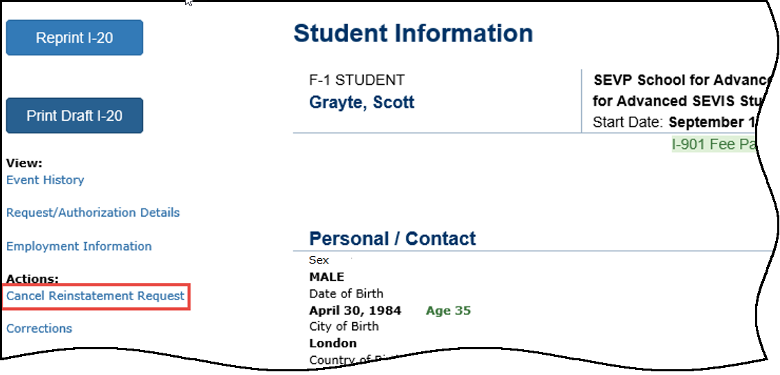
  1. Go to the student’s Student Information page.

Student Information Page

  2. Click Cancel Reinstatement Request. The Cancel Reinstatement Request page opens.

Cancel Reinstatement Request Page

  3. Enter any remarks to explain why the request is being cancelled.
  4. Click Cancel Reinstatement, Reset Values, or Cancel.

  • Cancel Reinstatement – Submits the request to cancel the reinstatement.
  • Reset Values – Clears any values entered into any of the fields on the page.
  • Cancel – Returns the user to the Student Information page without making any changes.

DSOs should not cancel in SEVIS any Reinstatement requests that have been mailed to USCIS. The student must write USCIS to withdraw the application.

What's New

Chatbot

Try the Facebook Chatbot

Visit the tool on the Study in the States Facebook page to learn how to become an F or M international student in the United States.

Summer Employment

Learn About Summer Employment

While employed this summer, make sure you have all the relevant information on maintaining your student status, and the steps you must take before returning to school. 

Icon Guide

See the SEVIS Help Icons on the SEVIS Help Hub for a quick-reference of the icons used in this user guide.

I'm Looking For

Contact Us

Phone

SEVP Response Center

703-603-3400

Office

Monday - Friday 
8:00 a.m. to 6:00 p.m. ET,
except holidays

Was This Helpful?
Please provide feedback on this page.