SEVIS Help Hub illustration

SEVIS Help Hub

Upload Evidence for Correction Requests

Upload Evidence for Correction Requests

Last updated: January 8, 2024

Quick Links:

|

Often when the Student and Exchange Visitor Program (SEVP) processes a student’s correction request, the adjudicators will need more information before a decision can be made.

This information may include the following:

  • Proof of Student Attendance
  • Letter of Explanation from the designated school official (DSO)
  • Form I-94, Arrival/Departure Record
  • Visa
  • Passport
  • Employment Authorization Document
  • Form I-765, Application for Employment Authorization, Page 1
  • Form I-539, Application to Extend/Change Nonimmigrant Status, Page 1

The DSO can upload this evidence directly to SEVP using the Student and Exchange Visitor Information System’s (SEVIS) upload evidence function.

Document requirements for a successful upload include:

  • File name cannot exceed 60 characters.
  • Cannot be encrypted or password protected.
  • Cannot exceed 10 MB per document.
  • Must be in the following file formats:
    • .DOCX

    • .DOC

    • .PDF

    • .XLS

    • .XLSX

    • .JPG

    •  .JPEG

    • .PNG

    • .GIF

    • .TXT

    • .CSV 

Icon- best practice
  • See the Correction Request articles on the SEVIS Help Hub for helpful lists of documentation that will aid adjudicators with the different correction request types.
  • DSOs can upload evidence at any time while the correction request is in Pending request status. 
  • A list of uploaded evidence will appear on the Upload Evidence page. However, DSOs will not be able to open the listed evidence. Label and store copies of uploaded evidence in a safe location at your school for future reference.
Icon - Pay attention to an important point

Once evidence is uploaded to SEVIS, it cannot be removed or deleted from SEVIS.

A DSO can upload evidence from two separate pages in SEVIS:

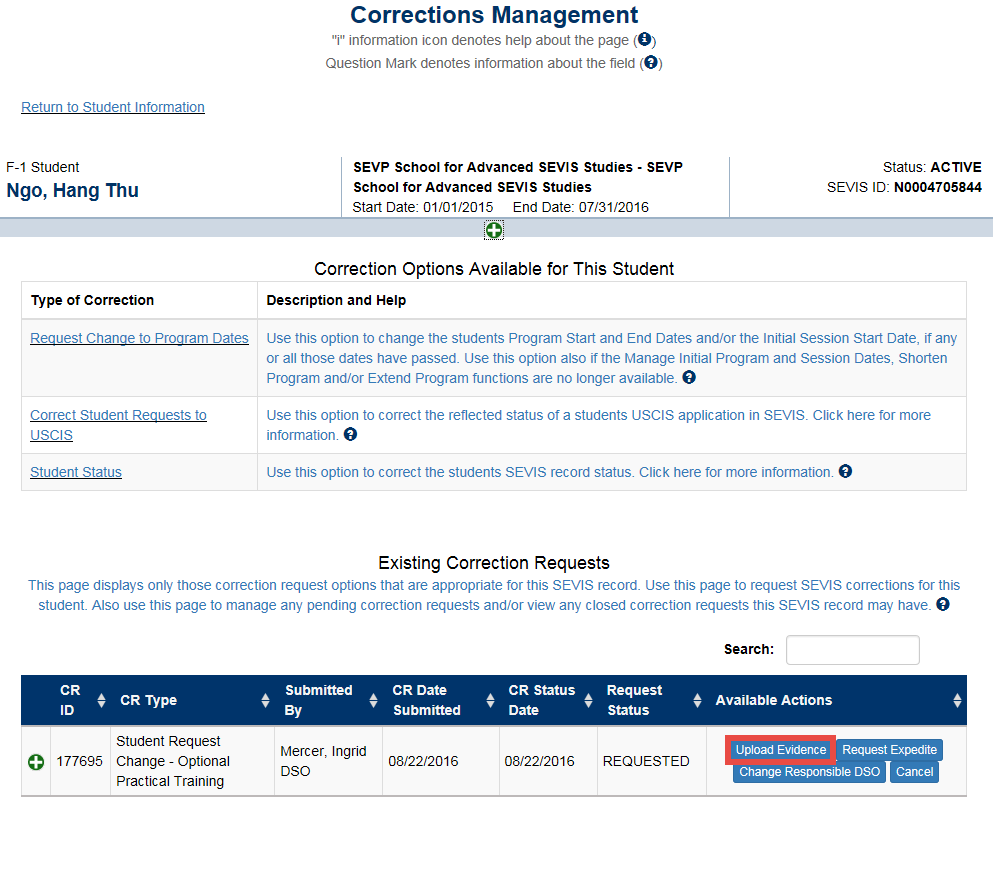
Screenshot of Available Actions column in the Existing Correction Requests section on the Corrections Management page
  • On the Submit Successful page, immediately after the DSO submits the correction request. 
Screenshot of the upload evidence button on the submit successful screen

To upload evidence from the student’s Corrections Management page or the Submit Successful page:

1. Click Upload Evidence. The Upload Correction Request Evidence page opens.

Upload Correction Request Evidence screen with upload evidence hyperlink outlined with a red rectangle

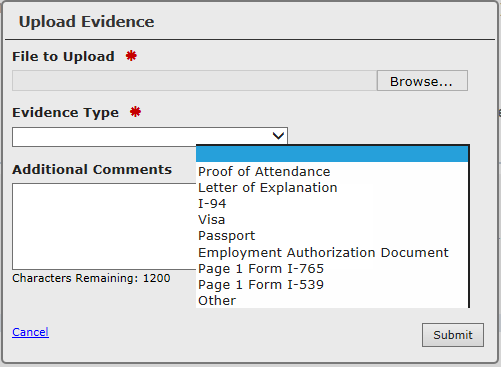
2. Click Upload Evidence. The Upload Evidence modal opens.

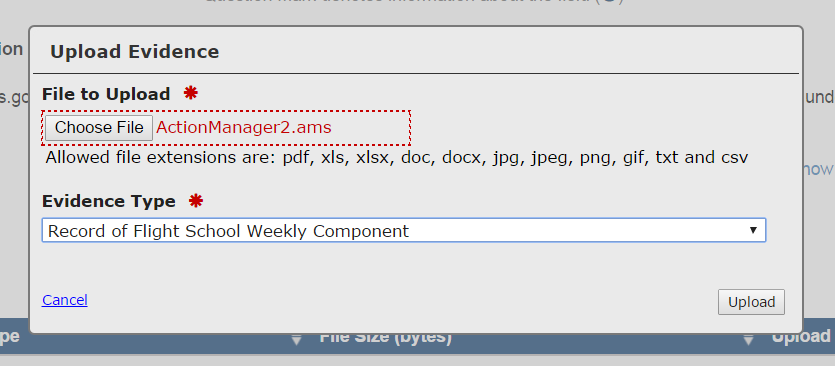
Upload evidence modal

3. Complete the following fields:

Field Description
File to Upload *  Click Browse to go to and select the evidence file. 
Evidence Type *

Select the evidence type from the drop-down list:

  • Proof of Attendance
  • Letter of Explanation
  • I-94
  • Visa
  • Passport
  • Employment Authorization Document
  • Page 1 Form I-765
  • Page 1 Form I-539
  • Other

Note: If Other is selected, a required Description field opens. Enter the type of evidence. This field is limited to 120 characters. 

Additional Comments Add additional useful comments regarding the evidence file. This field is limited to 1200 characters

4. Click one of the following:

  • Cancel: Returns the user to the Upload Correction Request Evidence page without uploading any evidence.
  • Submit: Uploads the evidence. The Upload Correction Request Evidence page opens. 
    • If the upload is unsuccessful, an Alert message will appear (see Upload Errors.)
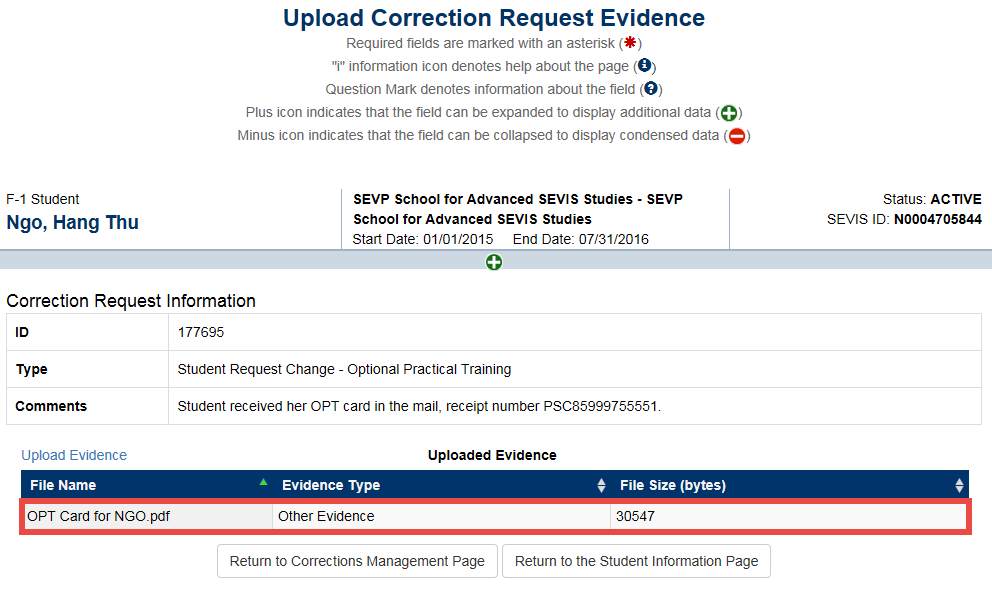
    • If the upload is successful, the evidence appears in a row under the Uploaded Evidence section.

Upload Correction Request Evidence screen displaying uploaded document filename

5. From the Upload Correction Request Evidence page, click either Upload Evidence, Return to Corrections Management Page, or Return to the Student Information Page:

Upload Evidence Screen with the upload evidence hyperlink, return to corrections management page button and return to the student information page button outlined in a red rectangle
  • Upload Evidence: Allows the user to upload additional evidence following the same process.
  • Return to Corrections Management Page: Opens the student’s Corrections Management page.
  • Return to the Student Information Page: Opens the student’s Student Information page.
Icon- additional information is available

To sort the data in the Uploaded Evidence table, click the arrows in the header row:

  • File Name
  • Evidence Type
  • File Size

If you encounter an error when attempting to upload a file, try again. Possible troubleshooting solutions are noted below. If the error persists, contact the SEVP Response Center at sevp@ice.dhs.gov or (703) 603-3400.

Users may encounter the following errors when attempting to upload files: 

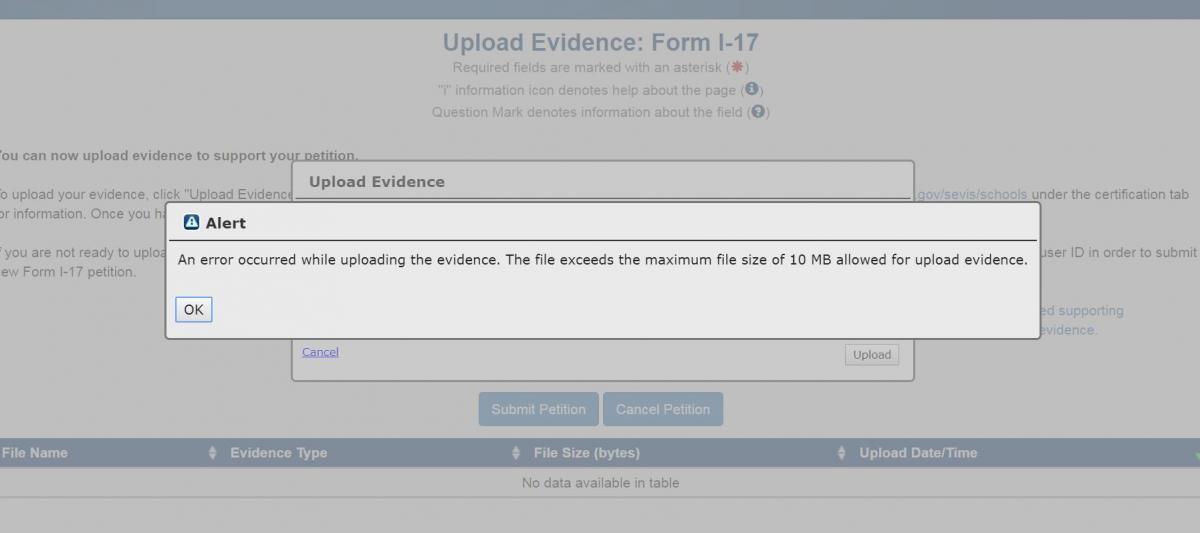
  • File too big: File size uploaded exceeds the required limit of 10MB.
Alert popup - An error occurred while uploading the evidence. The file exceeds the maximum file size of 10 MB allowed for upload evidence
  • Invalid file extensions: User attempts to upload a file that is not one of the allowed file types. The file extensions allowed are:
    • .DOCX
    • .DOC
    • .PDF
    • .XLS
    • .XLSX
    • .JPG
    • .JPEG
    • .PNG
    • .GIF
    • .TXT
    • .CSV
Invalide file extension uploaded to Upload Evidence modal
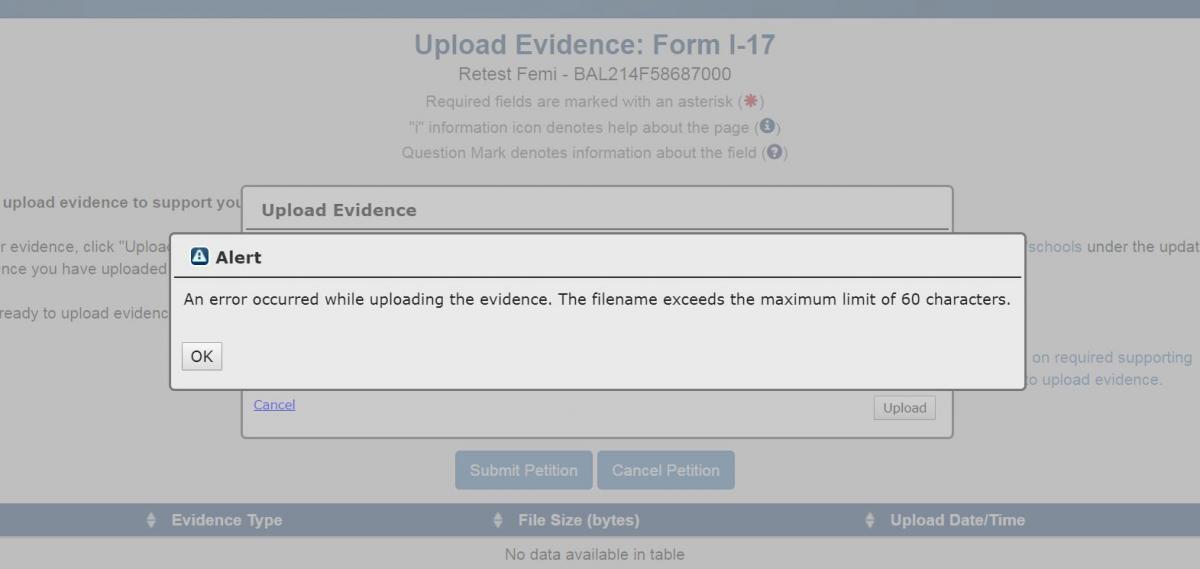
  • File name too long: File names are limited to 60 characters. 
Alert Popup - An error occurred while uploading the evidence. The filename exceeds the maximum limit of 60 characters.
  • Browser Error or “File was empty”: There may be times when documents fail to reach SEVIS from the user’s browser. If you encounter this error, try again, perhaps using another internet browser. (The optimal browser for SEVIS is Microsoft Edge). If the error persists, contact the SEVP Response Center by email at sevp@ice.dhs.gov to tell them that you have technical issues with uploads. 
Alert popup - File upload was not received or file was empty. Try again and, if the problem persists, call the SEVIS help desk
  • Error while saving evidence: During system outages, documents may not be saved. If you encounter this error, try again. If the error persists, contact the SEVP Response Center by email at sevp@ice.dhs.gov to tell them that you have technical issues with uploads. 
Alert popup - An error occurred while saving the evidence. Try again and, if the problem persists, call the SEVIS help desk
  • Malware: SEVIS scans all uploaded files for harmful malware. If SEVIS returns this message, it will not accept the file. If you encounter this error, try uploading again after virus scanning the file. 
Alert popup - Your document appears to contain malware. Check the document and try again

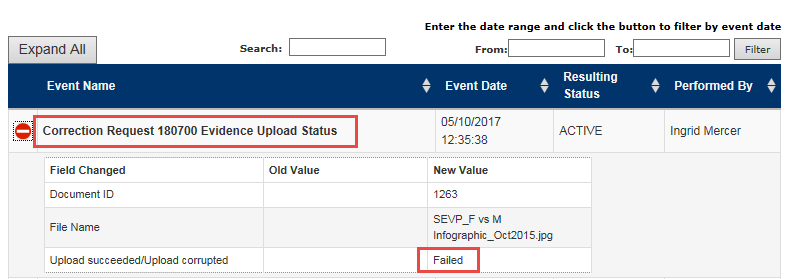
Sometimes SEVIS is unable to transmit uploaded evidence to the electronic storage location. DSOs can confirm that the evidence was fully transmitted by checking one of two fields in the student SEVIS record:

Existing Correction Requests Section on Corrections Management Page

Evidence Received will appear in the Request Status column for that correction request.

Existing Corrections Request: Evidenced received for Program Date Change

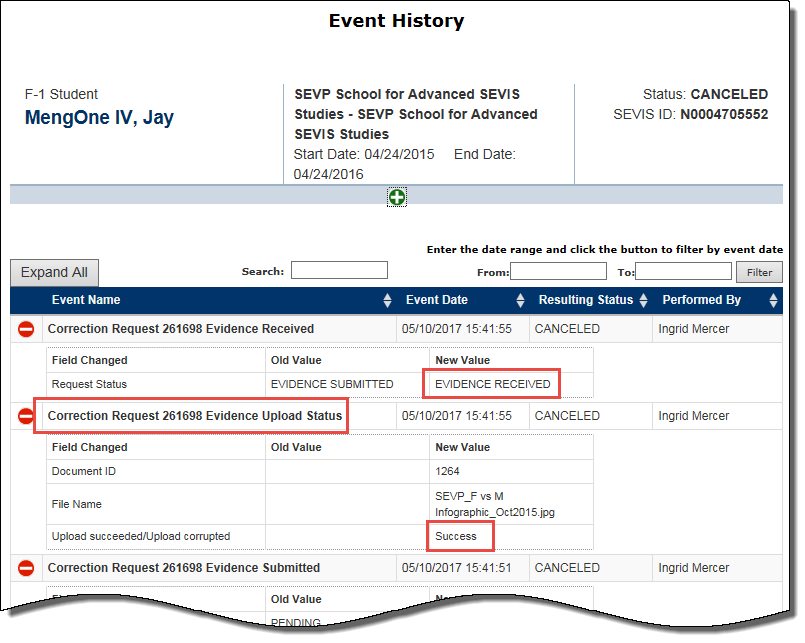
Correction Request [xxxx] Evidence Upload Status on Event History Page 

The Correction Request [xxxxx] Evidence Upload Status row text indicates a successful (Success) or corrupted upload (Failed) submission in the New Value column.

Icon- additional information is available

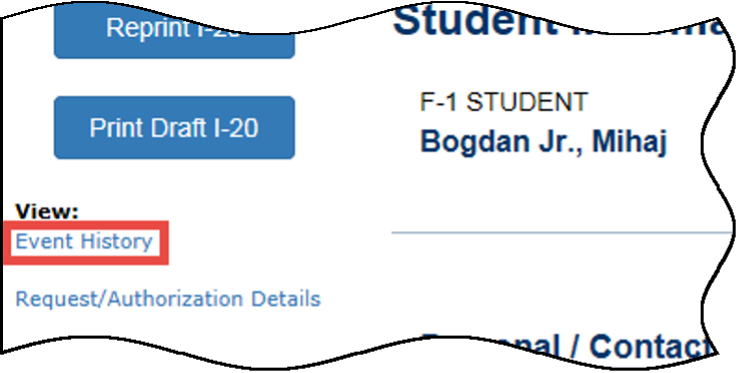
Go to the Event History page from the Event History link at the top left corner of the SEVIS Student Information page.

Event History hyperlink
  • Successful Evidence Upload:
Correction Request Successful Evidence Upload
  • Failed Evidence Upload: 
Failed Evidence Upload

What's New

Chatbot

Try the Facebook Chatbot

Visit the tool on the Study in the States Facebook page to learn how to become an F or M international student in the United States.

Summer Employment

Learn About Summer Employment

While employed this summer, make sure you have all the relevant information on maintaining your student status, and the steps you must take before returning to school. 

Icon Guide

See the SEVIS Help Icons on the SEVIS Help Hub for a quick-reference of the icons used in this user guide.

I'm Looking For

Contact Us

Phone

SEVP Response Center

703-603-3400

Office

Monday - Friday 
8:00 a.m. to 6:00 p.m. ET,
except holidays

Tipline

HSI Tip Line

1-877-4-HSI-TIP

Was This Helpful?
Please provide feedback on this page.